Difference between revisions of "Single"
(Created page with "'''Bend-Tech 7x Wiki :: Assembly :: PickPoints :: Single''' __NOTOC__ right <h2>Single</h2> <h3>Single Point</h3> Crea...") |
|||
| (3 intermediate revisions by the same user not shown) | |||
| Line 2: | Line 2: | ||
__NOTOC__ | __NOTOC__ | ||
[[File:assembly_pickpoints.png|right]] | [[File:assembly_pickpoints.png|right]] | ||
| + | <h3>Single Point</h3> | ||
| − | + | Click the '''Set Reference''' button [[File:set_reference.png]] and click a PickPoint to set it as the reference point. | |
| − | |||
| − | |||
| − | |||
| − | Click the '''Set Reference''' button and click a PickPoint to set it as the reference point. | ||
*'''Normal Mode:''' Use the fields to enter the incremental distance from the Reference point that the new point will be. | *'''Normal Mode:''' Use the fields to enter the incremental distance from the Reference point that the new point will be. | ||
| Line 21: | Line 18: | ||
| − | Click the '''Apply''' button to create the PickPoint. To reset all fields in the Single Point area to 0, click the '''Clear Values''' button. | + | '''''Note:''''' For easier navigation, notice how the harpoon fields axis rotates with the display frame and matches the orientation of the parts/points. |
| + | |||
| + | |||
| + | Click the '''Apply''' button [[File:apply.png]] to create the PickPoint. To reset all fields in the Single Point area to 0, click the '''Clear Values''' button. | ||
Latest revision as of 13:10, 6 June 2014
Bend-Tech 7x Wiki :: Assembly :: PickPoints :: Single
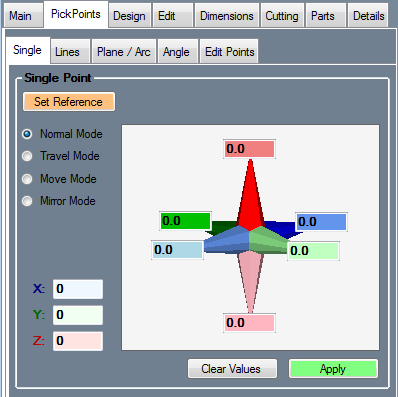
Single Point
Click the Set Reference button ![]() and click a PickPoint to set it as the reference point.
and click a PickPoint to set it as the reference point.
- Normal Mode: Use the fields to enter the incremental distance from the Reference point that the new point will be.
- Travel Mode: Use the fields to enter the incremental distance from the reference point that the new point will be. Once the Apply button is clicked, this new point will automatically become the new reference point.
- Move Mode: This mode is used to move points. The selected reference point will be the point that is moved. Enter values into the fields to move this point using it's original location as the reference location. Note: This is the only function in the assembly interface that can be used to relocate PickPoints.
- Mirror Mode: While in mirror mode, all points placed will have a copy of the point mirrored across all axes.
Note: For easier navigation, notice how the harpoon fields axis rotates with the display frame and matches the orientation of the parts/points.
Click the Apply button ![]() to create the PickPoint. To reset all fields in the Single Point area to 0, click the Clear Values button.
to create the PickPoint. To reset all fields in the Single Point area to 0, click the Clear Values button.
