Difference between revisions of "I know the Bend Angle and Length"
| (One intermediate revision by the same user not shown) | |||
| Line 5: | Line 5: | ||
Lets take the following part as our example: | Lets take the following part as our example: | ||
| − | AngleLength1. | + | [[File:AngleLength1.jpg]] |
| Line 12: | Line 12: | ||
As you may now know, the "Custom 3D Part" interface is looking for a rise and run style of dimension for this leg. | As you may now know, the "Custom 3D Part" interface is looking for a rise and run style of dimension for this leg. | ||
| − | AngleLength2. | + | [[File:AngleLength2.jpg]] |
We need to convert the 30 degrees and 15 inch leg over to a width and height measurements. To do this we use the "Trig" function under the "Help" pull-down. | We need to convert the 30 degrees and 15 inch leg over to a width and height measurements. To do this we use the "Trig" function under the "Help" pull-down. | ||
| − | AngleLength3. | + | [[File:AngleLength3.jpg]] |
You will find in the above picture a triangle with the corners labeled as '''"a", "b" & "c"''' and the edges labeled as '''"A", "B", "C".''' | You will find in the above picture a triangle with the corners labeled as '''"a", "b" & "c"''' and the edges labeled as '''"A", "B", "C".''' | ||
| Line 27: | Line 27: | ||
Once these values are entered we will find our rise and run values. In this case we have '''7.5''' for '''"A"''' and '''12.99''' for '''"B"'''. | Once these values are entered we will find our rise and run values. In this case we have '''7.5''' for '''"A"''' and '''12.99''' for '''"B"'''. | ||
| − | AngleLength4. | + | [[File:AngleLength4.jpg]] |
We finish up by going back to our Custom 3D part and entering our new found values into the appropriate fields. | We finish up by going back to our Custom 3D part and entering our new found values into the appropriate fields. | ||
| − | AngleLength5. | + | [[File:AngleLength5.jpg|800px]] |
Double check your values by looking at the "angle" up in the results chart. | Double check your values by looking at the "angle" up in the results chart. | ||
Latest revision as of 14:30, 26 June 2014
The Custom 3D interface is set up to move in Tri-Star directions and using a combination allows for tubing to go at an angle across the screen.
In some cases all you can get for information is the bend angle and length and you still would like to use the "Custom 3D Part" interface. No problem, we just need to learn how to use the "Trig" help function to give us the values we need.
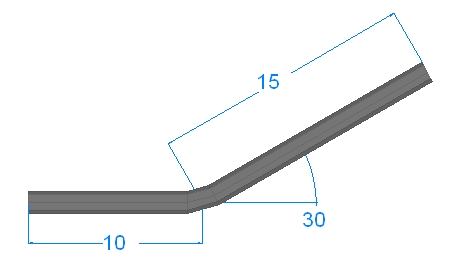
Lets take the following part as our example:
Note how the above part has a bend angle of 30 degrees with that leg having (a too apex) length of 15.
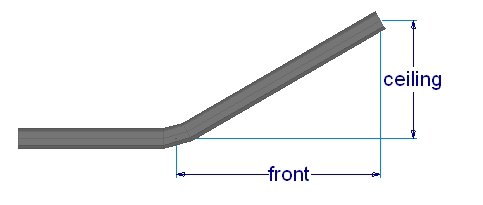
As you may now know, the "Custom 3D Part" interface is looking for a rise and run style of dimension for this leg.
We need to convert the 30 degrees and 15 inch leg over to a width and height measurements. To do this we use the "Trig" function under the "Help" pull-down.
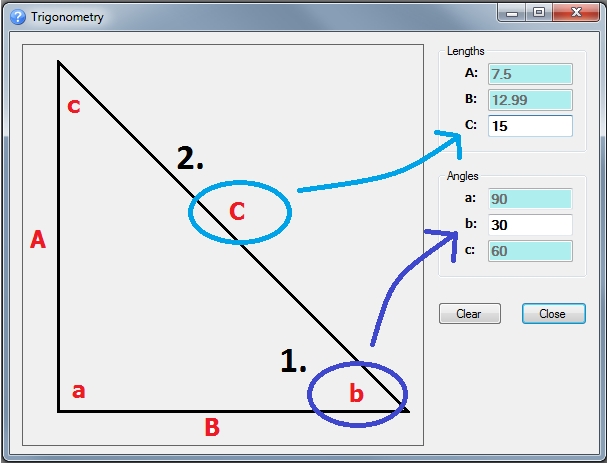
You will find in the above picture a triangle with the corners labeled as "a", "b" & "c" and the edges labeled as "A", "B", "C".
We know are angle is 30 degrees, so we filled in the little "b" field as 30 first. Please note that "a" & "b" will always add up to 90 degrees.
We also know our leg length is 15. We entered a 15 into the upper "C" field. This is known in the math world as our hypotenuse.
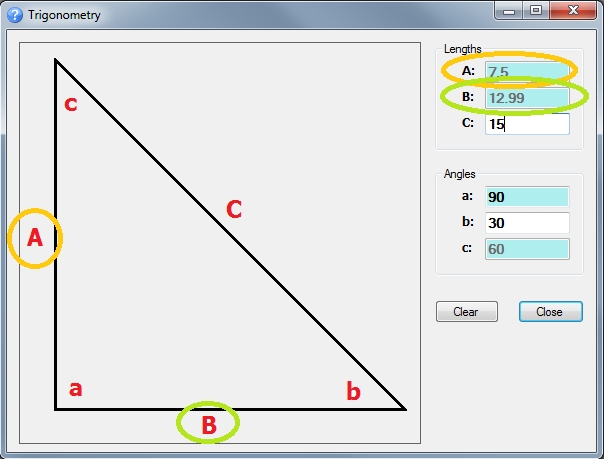
Once these values are entered we will find our rise and run values. In this case we have 7.5 for "A" and 12.99 for "B".
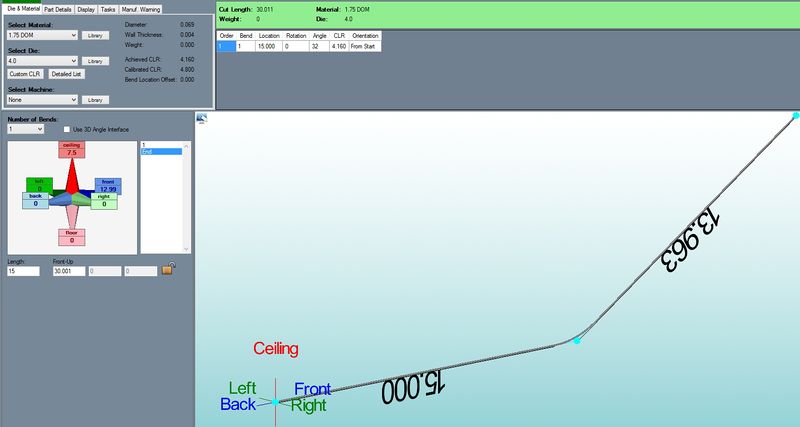
We finish up by going back to our Custom 3D part and entering our new found values into the appropriate fields.
Double check your values by looking at the "angle" up in the results chart.
