Difference between revisions of "Dragon"
(→Edit Geometry) |
|||
| (55 intermediate revisions by the same user not shown) | |||
| Line 1: | Line 1: | ||
| − | |||
| − | |||
*Our Bend-Tech Dragon software works alongside with Bend-Tech Industrial and is meant to prep the part(s) or project before production using the Dragon machine. | *Our Bend-Tech Dragon software works alongside with Bend-Tech Industrial and is meant to prep the part(s) or project before production using the Dragon machine. | ||
*The '''"Dragon Task Menu"''' consists of 3 options for creating new parts. Bend-Tech Dragon will also allow transfers from Bend-Tech Industrial and other designers. | *The '''"Dragon Task Menu"''' consists of 3 options for creating new parts. Bend-Tech Dragon will also allow transfers from Bend-Tech Industrial and other designers. | ||
| + | |||
| + | '''"We strongly suggest that no USB devices be plugged into your computer and no programs are running at the same time as running our Dragon software."''' | ||
[[File:Dragon_Task_Menu(1).png]] | [[File:Dragon_Task_Menu(1).png]] | ||
| Line 120: | Line 120: | ||
=Custom Design= | =Custom Design= | ||
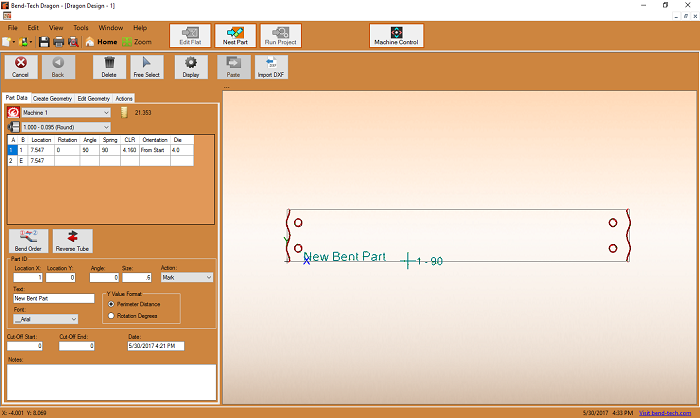
[[File:Dragon_Custom_Design(1).png|right]] The '''"Custom Design"''' interface is where users will do all the fine tuning of their part before fabrication. Here, you will be able to create holes and text among other things, manipulate the tube to reverse it, retrieve dimensions for distances on the tube, assign contours with marking, etching and cutting actions, placing the plasma lead in and so forth. | [[File:Dragon_Custom_Design(1).png|right]] The '''"Custom Design"''' interface is where users will do all the fine tuning of their part before fabrication. Here, you will be able to create holes and text among other things, manipulate the tube to reverse it, retrieve dimensions for distances on the tube, assign contours with marking, etching and cutting actions, placing the plasma lead in and so forth. | ||
| + | |||
| + | ==Action Menu Buttons== | ||
| + | [[File:Dragon_Action_Buttons1.png]] | ||
| + | * The '''"Cancel"''' [[File:Dragon_Cancel1.png]] button is used to end a function that is currently in process or tied to your cursor. (Ex. If your text is tied to your cursor and you realize you made a typo, you can click the Cancel button and fix the typo before you place the text in the design.) | ||
| + | |||
| + | * The '''"Back"''' [[File:Dragon_Back1.png]] button will allow you to go back and re-do a step while operating a multiple step function | ||
| + | |||
| + | * Click the '''"Delete"''' [[File:Dragon_Delete1.png]] button and then a feature in the design to erase it completely from the design. | ||
| + | |||
| + | * Click the '''"Free Select"''' [[File:Dragon_Free_Select1.png]] button to enable the option to place an entity anywhere in the design. When Free Select is disabled, placement of entities in the design will be constrained to a point. | ||
| + | |||
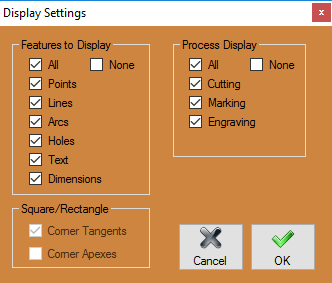
| + | * Click the '''"Settings"''' [[File:Dragon_Settings_Opt1.png]] button to view and change settings for display. | ||
| + | [[File:Dragon_Display_Settings_Window1.png]] | ||
| + | |||
| + | * Click the '''"Paste"''' [[File:Dragon_Paste1.png]] button after using the '''Copy''' tool in order to paste the desired part back into the design. | ||
==Action Tabs== | ==Action Tabs== | ||
===Part Data=== | ===Part Data=== | ||
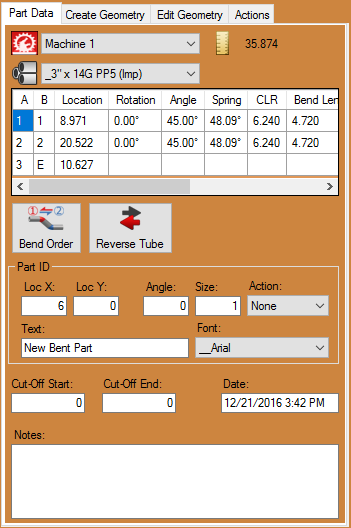
| − | * The '''"Part Data"''' tab shows current material, cut length, full bending instructions, options to change the bend order, add cut-off and personal dates and notes associated with the current part. | + | [[File:Dragon_Part_Data(1).png|right]]* The '''"Part Data"''' tab shows current material, cut length, full bending instructions, options to change the bend order, add cut-off and personal dates and notes associated with the current part. |
| − | |||
*The '''Material''' [[File:Dragon_Material(2).png]] that is applied to the part is shown in the upper left hand corner of the tab. | *The '''Material''' [[File:Dragon_Material(2).png]] that is applied to the part is shown in the upper left hand corner of the tab. | ||
| Line 134: | Line 148: | ||
*The '''"Bend Order"''' [[File:Dragon_Bend_Order(1).png]] button will open the bending simulation and will allow the user to manipulate the part for bending only. Please see our [http://www.bend-tech.com/wiki7/index.php?title=Bend_Order_Tutorial Bend Order Tutorial] in order to learn more. | *The '''"Bend Order"''' [[File:Dragon_Bend_Order(1).png]] button will open the bending simulation and will allow the user to manipulate the part for bending only. Please see our [http://www.bend-tech.com/wiki7/index.php?title=Bend_Order_Tutorial Bend Order Tutorial] in order to learn more. | ||
| − | *The '''"Reverse Tube"''' [[File:Dragon_Reverse_Tube(1).png]] button will reverse all of the geometry of the part including copes, bend locations, text, holes, etc. | + | *The '''"Reverse Tube"''' [[File:Dragon_Reverse_Tube(1).png]] button will reverse all of the geometry of the part including copes, bend locations, text, holes, etc. '''This will NOT mirror the part itself.''' |
*The '''"Cut-Off Start:"''' and '''"Cut-Off End:"''' [[File:Dragon_Cut_Off(1).png]] text fields are where users can input values to add cut-off to either end of the tubing. | *The '''"Cut-Off Start:"''' and '''"Cut-Off End:"''' [[File:Dragon_Cut_Off(1).png]] text fields are where users can input values to add cut-off to either end of the tubing. | ||
| Line 277: | Line 291: | ||
<li style="display: list-item;">'''Break Both:''' With "'''Break Both:'''" selected, click on two entities in any order. Unlike Break Single, Break Both will break both entities. If the Create Point at Break checkbox is selected, a point will be created at the intersection of the entities.</li> | <li style="display: list-item;">'''Break Both:''' With "'''Break Both:'''" selected, click on two entities in any order. Unlike Break Single, Break Both will break both entities. If the Create Point at Break checkbox is selected, a point will be created at the intersection of the entities.</li> | ||
<li style="display: list-item;">'''Break Gang:''' With "'''Break Gang:'''" selected, click on the entity that will be used to break intersecting entities. Click on the intersecting entities one at a time to break them at the point of intersection with the first entity. If the Create Point at Break box is checked, a point will be created at each break.</li> | <li style="display: list-item;">'''Break Gang:''' With "'''Break Gang:'''" selected, click on the entity that will be used to break intersecting entities. Click on the intersecting entities one at a time to break them at the point of intersection with the first entity. If the Create Point at Break box is checked, a point will be created at each break.</li> | ||
| + | |||
| + | ===Actions=== | ||
| + | [[File:Dragon_Actions1.png|right]] | ||
| + | The Actions tab contains buttons to help the user assign contours with either cutting, etching or marking. Here, you are able to assign the lead-in location and finely tune the actions that the Dragon machine will take while fabricating your part. | ||
| + | |||
| + | *'''Marking:''' Click the '''"Marking"''' [[File:Dragon_Marking1.png]] button followed by a contour in the design to designate the action to that contour. | ||
| + | |||
| + | *'''Etching:''' Click the '''"Etching"''' [[File:Dragon_Etching1.png]] button followed by a contour in the design to designate the action to that contour. | ||
| + | |||
| + | *'''Start Cut:''' Click the '''"Start Cut"''' [[File:Dragon_Start_Cut1.png]] button followed by the start cut of the tube to designate it. | ||
| + | |||
| + | *'''End Cut:''' Click the '''"End Cut"''' [[File:Dragon_End_Cut1.png]] button followed by the end cut of the tube to designate it. | ||
| + | |||
| + | *'''Cutout:''' Click the '''"Cutout"''' [[File:Dragon_Cutout1.png]] button followed by a contour in the design to designate the cutting action to that contour. | ||
| + | |||
| + | *'''Convert:''' Click the '''"Convert"''' [[File:Dragon_Convert1.png]] button followed by a contour in order to change the action assigned to it. A window will appear with the options for '''"None (Remove), Cutting, Marking,''' and '''Etching'''. Press the '''"OK"''' button to assign the selected action. | ||
| + | [[File:Dragon_Convert_Process1.png]] | ||
| + | |||
| + | *'''Remove:''' Click the '''"Remove"''' [[File:Dragon_Remove_Contour1.png]] button followed by the contour(s) you'd like to remove from the design. | ||
| + | |||
| + | *'''Move Lead:''' Click the '''"Move Lead"''' [[File:Dragon_Move_Lead.png]] button and then the notch that represents the lead-in for a cut-assigned contour. Then, select the lead-in's new location. This is the plasma torch's piercing point. | ||
| + | |||
| + | *'''Edit Lead:''' Click the '''"Edit Lead"''' [[File:Dragon_Edit_Lead.png]] button and then the notch that represents the lead-in for a cut-assigned contour in order to change the lead-in's direction and angle of pierce. | ||
| + | |||
| + | =Dragon Nesting= | ||
| + | *[[File:Dragon_Nesting1.png|right]] '''Material:''' The '''"Material:"''' [[File:Dragon_Nesting_Material1.png]] section is where the current material is shown. This includes diameter and wall thickness. | ||
| + | |||
| + | *'''Stock Length:''' The '''"Stock Length:"''' [[File:Dragon_Stock Length1.png]] can be entered and shown here. This is the overall length of your stock pipe or tubing. | ||
| + | |||
| + | *'''Web Size:''' The '''"Web Size:"''' [[File:Dragon_Web_Size1.png]] can be entered and shown here. This is the default distance allowed between parts as they appear on the stock length of tubing in the design. | ||
| + | |||
| + | ==Action Tabs== | ||
| + | ===Parts=== | ||
| + | *The '''"Parts"''' tab will show your parts and allow you to organize them according to order of fabrication. This tab will show the name, length and quantity of each part that has been imported into the current nesting project. | ||
| + | |||
| + | *'''Master Part:''' Clicking the '''"Master Part"''' [[File:Dragon_Master_Part1.png]] button will open up a menu giving options for users to either '''"Insert Part"''' , '''"Remove Part"''' or '''"Flip Part"'''. These options will apply to the part(s) above and how they are orientated within the nesting project. | ||
| + | |||
| + | *'''Insert Part:''' Clicking the '''"Insert Part"''' [[File:Dragon_Insert_Part1.png]] button will allow the user to insert the highlighted part into the design at a location designated by the user. | ||
| + | |||
| + | *'''Remove Part:''' Clicking the '''"Remove Part"''' [[File:Dragon_Remove_Part1.png]] button will remove the highlighted part from the part list above. | ||
| + | |||
| + | *'''Flip Part:''' Clicking the '''"Flip Part"''' [[File:Dragon_Flip_Part1.png]] button will reverse all of the geometry of the highlighted part from the list above and create a new listed part. These will be marked '''Flipped''' in the part name. | ||
| + | |||
| + | *'''Re-Order:''' Clicking the '''"Re-Order"''' [[File:Dragon_Re_Order1.png]] button will allow the user to select a length of tubing in the display screen and move it to a new location in the order. | ||
| + | |||
| + | *'''Move:''' Clicking the '''"Move"''' [[File:Dragon_Move1.png]] button and clicking an intended part in the display screen will allow the user to move the part along with every part behind it. Clicking once more will set the lengths of tubing where they are at that time. | ||
| + | |||
| + | *'''Rotate:''' Clicking the '''"Rotate"''' [[File:Dragon_Rotate1.png]] button and clicking an intended part in the display screen will allow the user to rotate the part itself around the diameter of the tubing. Clicking once more will set the length of tubing where it is at that time. | ||
| + | |||
| + | *'''Remove:''' Clicking the '''"Remove"''' [[File:Dragon_Remove2.png]] button and clicking an intended part in the display screen will erase it from the nesting design. | ||
| + | |||
| + | ===Shifts=== | ||
| + | *[[File:Dragon_Shifts1.png|right]] The '''Shifts''' tab will allow the user to assign the actions of the machine to each specific contour, profile and mark within the nesting project. | ||
| + | |||
| + | *'''Assign Actions:''' Click the '''"Assign Actions"''' [[File:Dragon_Assign_Actions1.png]] button after a shift action from the list above has been selected. Then, click on the blue highlighted rectangle in the display screen in order to move it to a new location. Contours inside the highlighted area will be included in the shift. | ||
| + | |||
| + | *'''Flip:''' Click the '''"Flip"''' [[File:Dragon_Flip1.png]] button after a shift from the list above has been selected. The entire geometry of the shift will become reversed. | ||
| + | |||
| + | *'''Add Shift:''' Click the '''"Add Shift"''' [[File:Dragon_Add_Shift1.png]] button and a new shift will be added into the design for the user. | ||
| + | |||
| + | *'''Delete:''' Click the '''"Delete"''' [[File:Dragon_Delete3.png]] button after a shift from the list above has been selected. It will be removed from the nesting project. | ||
| + | |||
| + | |||
| + | |||
| + | *<div style="font-size:12pt;color:#CC0000;">'''Transfer to Mach: When you are finished with your nesting project and are ready for fabrication, you can send all of this information to your machine by clicking on the "Transfer to Mach" [[File:Dragon_Trasfer_To_Mach1.png]] button at the top of the screen.'''</div> | ||
Latest revision as of 15:37, 31 December 2015
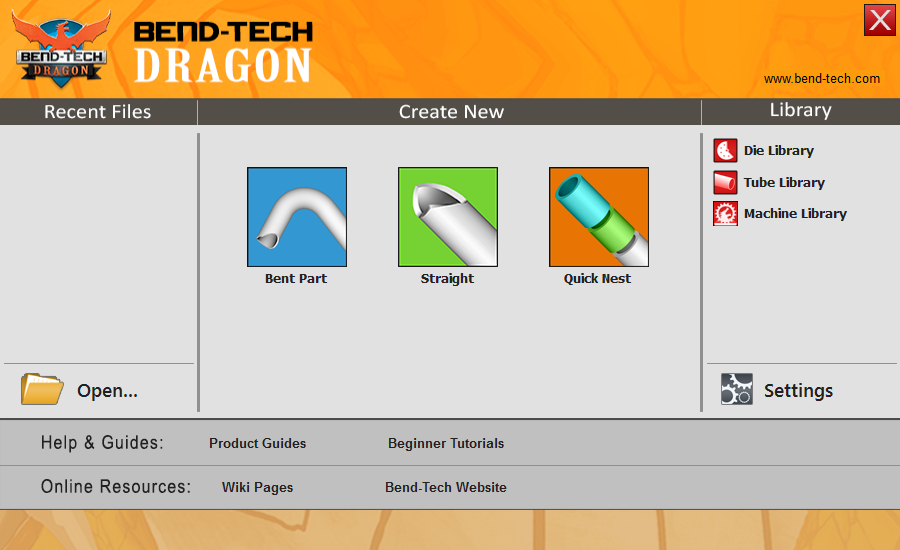
- Our Bend-Tech Dragon software works alongside with Bend-Tech Industrial and is meant to prep the part(s) or project before production using the Dragon machine.
- The "Dragon Task Menu" consists of 3 options for creating new parts. Bend-Tech Dragon will also allow transfers from Bend-Tech Industrial and other designers.
"We strongly suggest that no USB devices be plugged into your computer and no programs are running at the same time as running our Dragon software."
Bent Part
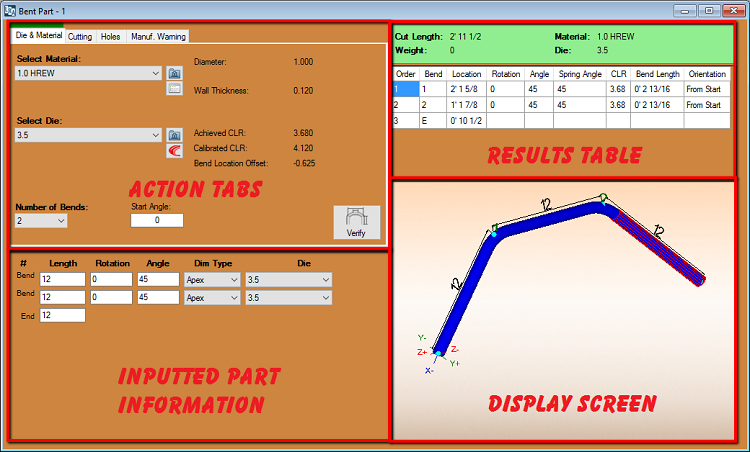
- Clicking on this option will allow the user to create a new "Custom Part" including bends and end cuts. It has many of the same characteristics of our "Custom Part" designer, except with a few additions that users will need in order to add copes or mitered cuts on the ends of the tubing.
Action Tabs
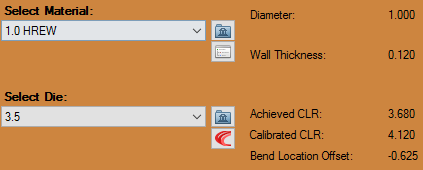
Die & Material
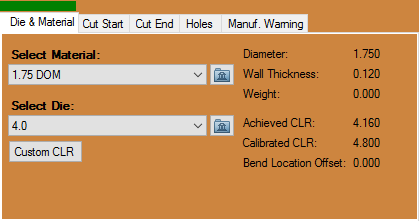
- The "Die & Material" section is where users will select the die which will be assigned to bend the part and the material associated with that die.
- The section to the right of these drop down menus will show the information associated to the current die and material.
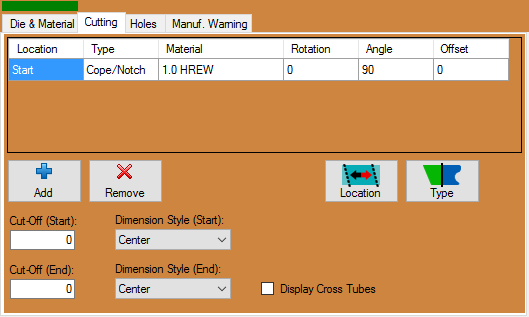
Cut Start / Cut End
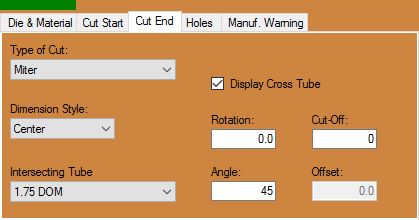
The "Cut Start" tab will determine the cuts on the starting of the tube, while the "Cut End" tab will determine the cuts on the ending of the tube.
- The "Type of Cut" section gives users the option to choose a type of cut from "None", "Coping (Fishmouth)" and "Miter".
- The "Intersecting Tube:" drop down menu will give users the option to choose the size of tube that the current part will be intersecting with. This will adjust the size of the end cope(s) or miter cut profile(s).
- Checking the "Knifed Edge" check box will cause the coped or mitered cuts to appear as if they are cut flush to the intersecting tube.
- Checking the "Display Cross Tube" check box will cause the intersecting cross tube to appear in the display screen.
- Used only when the "Cut Type" is set to "Coping (Fishmouth)" or "Miter", the degree of rotation entered into the "Rotation:" field will determine the rotation of the cut on either the start or end of the tube.
- Used only when the "Cut Type" is set to "Coping (Fishmouth)" or "Miter", the degree of angle entered into the "Angle:" field will determine the angle of the cut on either the start or end of the tube.
- The value entered into the "Cut-Off:" field will determine how many extra units (inches or millimeters) of tubing will be added to the start or end of the tube.
- Used only when the "Cut Type" is set to "Coping (Fishmouth)", the value entered into the "Offset:" field will determine how the intersecting tube is offset from the start or end of the tube.
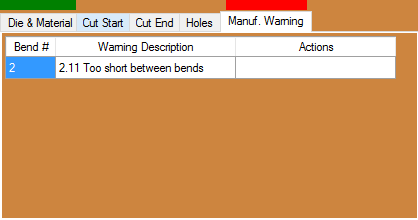
Manuf. Warning
The "Manufacturing Warning" tab will show the user if the part that was created is or isn't a valid part ready for production.
 button at the top of the screen. To learn more about this interface, scroll down to the "Custom Design" section of this Wiki.
 button.
Straight Part
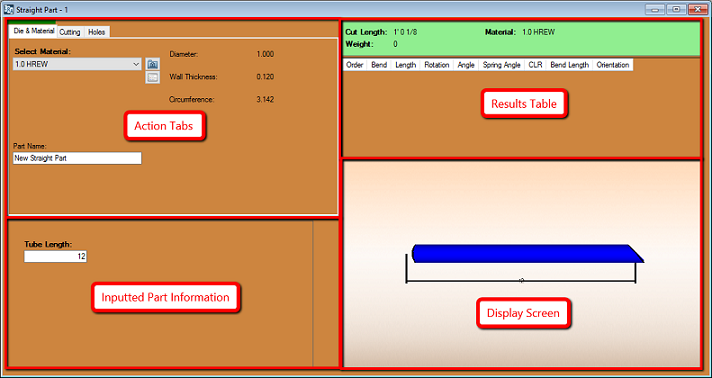
- Clicking on this option will allow the user to create a straight part with either flat, coped or mitered end cuts. This option will also let the user account for rotation, angles and offsets for the tube ends.
Select Material:
1. The "Select Material:" drop down menu is where users will choose their desired material.
Type of Cut
2. The "Type of Cut (Start / End)" sections give users the option to choose a type of cut from "None", "Coping (Fishmouth)" and "Miter".
Intersecting Tube
3. The "Intersecting Tube:" drop down menu will give users the option to choose the size of tube that the current part will be intersecting with. This will adjust the size of the end cope(s) or miter cut profile(s).
Knifed Edge
4. Checking the "Knifed Edge" check box will cause the coped or mitered cuts to appear as if they are cut flush to the intersecting tube.
Tube Length:
5. The value entered into the "Tube Length:" field will determine the overall length of the part.
Rotation:
6. Used only when the "Cut Type" is set to "Coping (Fishmouth)" or "Miter", the degree of rotation entered into the "Rotation:" field will determine the rotational offset of the cuts on the tube. When the "Counter-clockwise" check box is checked, the rotation of the part will change counter-clockwise based on the rotational amount entered.
Angle:
7. Used only when the "Cut Type" is set to "Coping (Fishmouth)" or "Miter", the degree of angle entered into the "Angle:" field will determine the angle of the cut on either the start or end of the tube.
Offset:
8. Used only when the "Cut Type" is set to "Coping (Fishmouth)", the value entered into the "Offset:" field will determine how the intersecting tube is offset from the start or end of the tube.
Display Screen
9. The "Display Screen" is where your current part will be shown. Click the "Home" button in the upper left hand corner to return the part to its original view.
Cancel
10. The "Cancel" button will close the window and you will lose any information applied to the designed part.
OK
11. The "OK" button will send the part shown to Dragon's flat layout mode known as "Custom Design".
 button.
Quick Nest
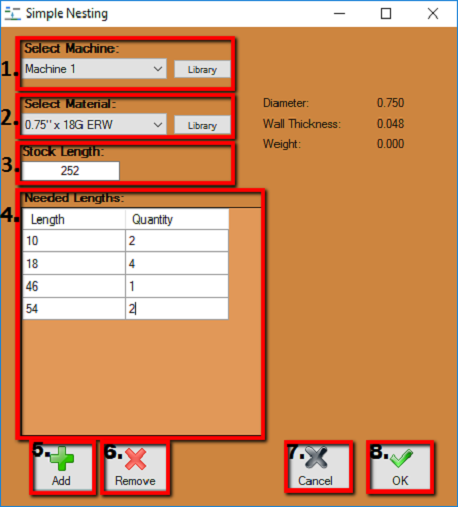
Clicking on this option will give you the ability to nest multiple length parts together in order to accommodate the stock length of tubing you are working with.
Select Material:
1. The "Select Material:" drop down menu is where users will choose their desired material. To the right, the material information will be shown.
Stock Length:
2. The "Stock Length:" field is where users will enter the stock length of their material (in inches or millimeters based on the units of measurement specified in the "Options" menu).
Needed Lengths:
3. The "Needed Lengths:" section is where users will enter the values of their part lengths and quantities of each. These can be added by selecting the "Add" button below this section.
Add
4. Clicking the "Add" button will allow another line to be added to the "Needed Lengths:" section.
Remove
5. Clicking the "Remove" button will remove a line from the "Needed Lengths:" section.
Cancel
6. Clicking the "Cancel" button will close the simple nesting window and you will lose any progress made in this window.
OK
7. Clicking the "OK" button will send the "Needed Lengths:" to the "Dragon Nesting" interface where users will be able to view the lengths nested along their stock length of tubing. Editing can also be done there as well.
Custom Design
The "Custom Design" interface is where users will do all the fine tuning of their part before fabrication. Here, you will be able to create holes and text among other things, manipulate the tube to reverse it, retrieve dimensions for distances on the tube, assign contours with marking, etching and cutting actions, placing the plasma lead in and so forth.Action Menu Buttons
- The "Cancel"
 button is used to end a function that is currently in process or tied to your cursor. (Ex. If your text is tied to your cursor and you realize you made a typo, you can click the Cancel button and fix the typo before you place the text in the design.)
- The "Back"
 button will allow you to go back and re-do a step while operating a multiple step function
- Click the "Free Select"
 button to enable the option to place an entity anywhere in the design. When Free Select is disabled, placement of entities in the design will be constrained to a point.
- Click the "Paste"
 button after using the Copy tool in order to paste the desired part back into the design.
Action Tabs
Part Data
* The "Part Data" tab shows current material, cut length, full bending instructions, options to change the bend order, add cut-off and personal dates and notes associated with the current part.- The Bending Instructions
 section will show you the bend number, bend location, rotation, angle, spring angle, CLR and orientation for the current part.
- The "Bend Order"
 button will open the bending simulation and will allow the user to manipulate the part for bending only. Please see our Bend Order Tutorial in order to learn more.
- The "Reverse Tube"
 button will reverse all of the geometry of the part including copes, bend locations, text, holes, etc. This will NOT mirror the part itself.
- The "Cut-Off Start:" and "Cut-Off End:"
 text fields are where users can input values to add cut-off to either end of the tubing.
Create Geometry
Point
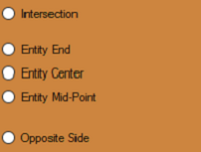
 button to place the point. The reference point will always be (0,0) (or the origin that shows X and Y in the display area).
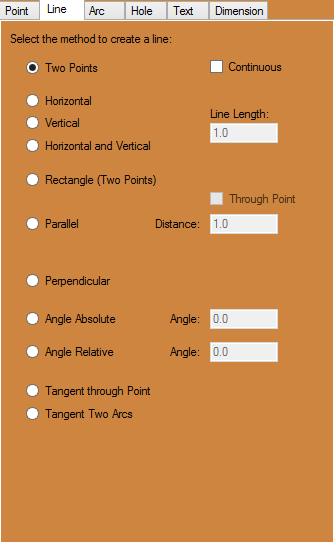
 Line
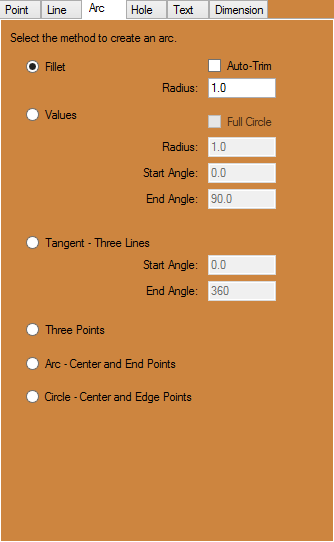
Arc
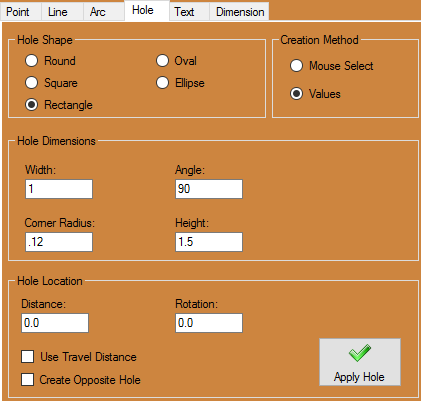
Hole
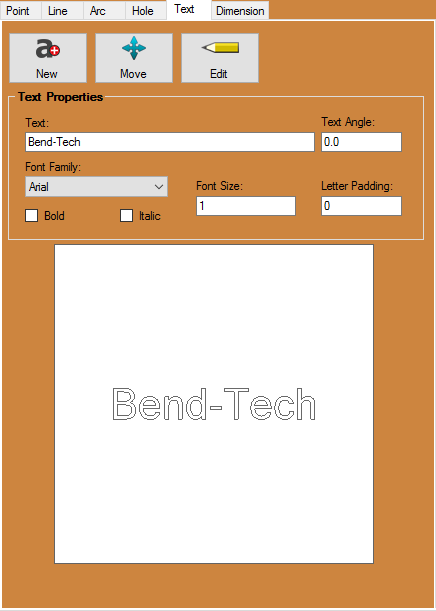
Text
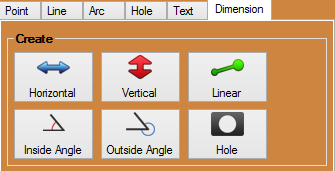
Dimension
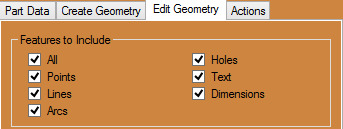
Edit Geometry
Features to Include
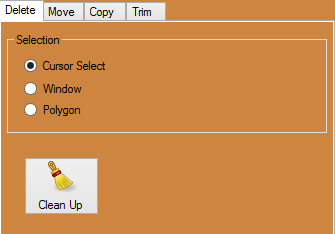
Delete
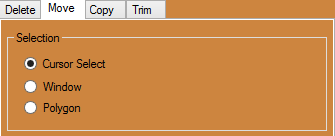
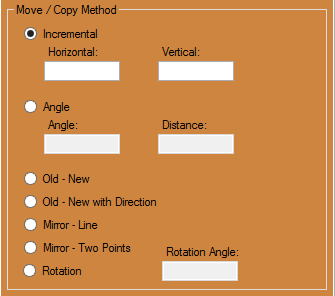
Move
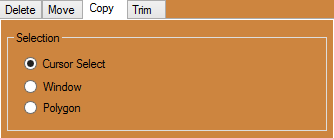
Copy
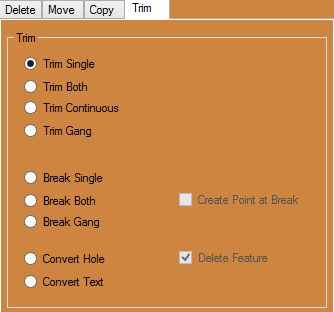
Trim
Actions
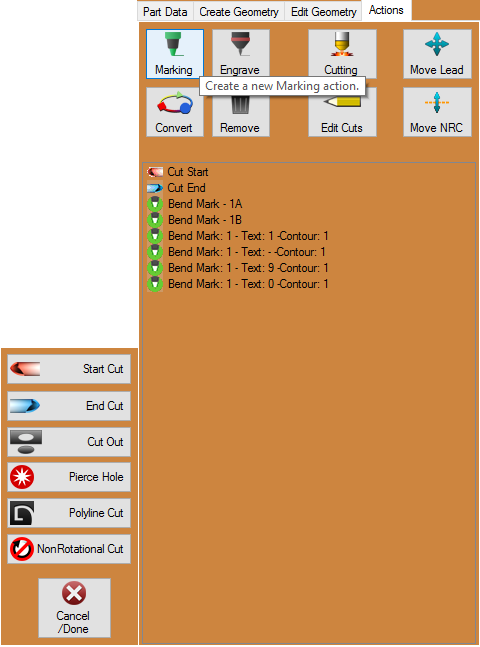
The Actions tab contains buttons to help the user assign contours with either cutting, etching or marking. Here, you are able to assign the lead-in location and finely tune the actions that the Dragon machine will take while fabricating your part.
- Marking: Click the "Marking"
 button followed by a contour in the design to designate the action to that contour.
- Etching: Click the "Etching"
 button followed by a contour in the design to designate the action to that contour.
- Cutout: Click the "Cutout"
 button followed by a contour in the design to designate the cutting action to that contour.
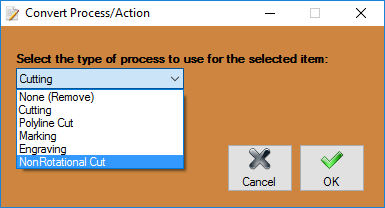
- Convert: Click the "Convert"
 button followed by a contour in order to change the action assigned to it. A window will appear with the options for "None (Remove), Cutting, Marking, and Etching. Press the "OK" button to assign the selected action.
- Move Lead: Click the "Move Lead"
 button and then the notch that represents the lead-in for a cut-assigned contour. Then, select the lead-in's new location. This is the plasma torch's piercing point.
- Edit Lead: Click the "Edit Lead"
 button and then the notch that represents the lead-in for a cut-assigned contour in order to change the lead-in's direction and angle of pierce.
Dragon Nesting
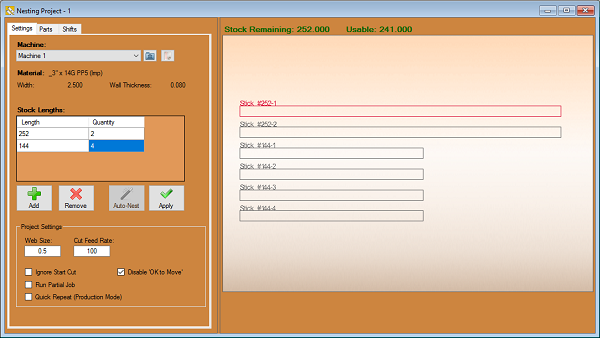
- Material: The "Material:"
 section is where the current material is shown. This includes diameter and wall thickness.
- Stock Length: The "Stock Length:"
 can be entered and shown here. This is the overall length of your stock pipe or tubing.
- Web Size: The "Web Size:"
 can be entered and shown here. This is the default distance allowed between parts as they appear on the stock length of tubing in the design.
Action Tabs
Parts
- The "Parts" tab will show your parts and allow you to organize them according to order of fabrication. This tab will show the name, length and quantity of each part that has been imported into the current nesting project.
- Master Part: Clicking the "Master Part"
 button will open up a menu giving options for users to either "Insert Part" , "Remove Part" or "Flip Part". These options will apply to the part(s) above and how they are orientated within the nesting project.
- Insert Part: Clicking the "Insert Part"
 button will allow the user to insert the highlighted part into the design at a location designated by the user.
- Remove Part: Clicking the "Remove Part"
 button will remove the highlighted part from the part list above.
- Flip Part: Clicking the "Flip Part"
 button will reverse all of the geometry of the highlighted part from the list above and create a new listed part. These will be marked Flipped in the part name.
- Re-Order: Clicking the "Re-Order"
 button will allow the user to select a length of tubing in the display screen and move it to a new location in the order.
- Move: Clicking the "Move"
 button and clicking an intended part in the display screen will allow the user to move the part along with every part behind it. Clicking once more will set the lengths of tubing where they are at that time.
- Rotate: Clicking the "Rotate"
 button and clicking an intended part in the display screen will allow the user to rotate the part itself around the diameter of the tubing. Clicking once more will set the length of tubing where it is at that time.
- Remove: Clicking the "Remove"
 button and clicking an intended part in the display screen will erase it from the nesting design.
Shifts
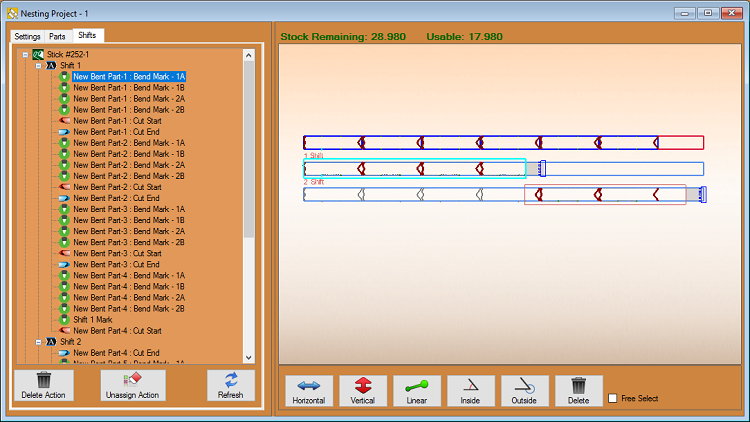
- The Shifts tab will allow the user to assign the actions of the machine to each specific contour, profile and mark within the nesting project.
- Assign Actions: Click the "Assign Actions"
 button after a shift action from the list above has been selected. Then, click on the blue highlighted rectangle in the display screen in order to move it to a new location. Contours inside the highlighted area will be included in the shift.
- Flip: Click the "Flip"
 button after a shift from the list above has been selected. The entire geometry of the shift will become reversed.
- Delete: Click the "Delete"
 button after a shift from the list above has been selected. It will be removed from the nesting project.
