Difference between revisions of "Dragon Tips & Hints"
| (25 intermediate revisions by 2 users not shown) | |||
| Line 1: | Line 1: | ||
'''This page will discuss tips and hints that we've found useful for Dragon users who experience various difficulties with their machine and/or components.''' | '''This page will discuss tips and hints that we've found useful for Dragon users who experience various difficulties with their machine and/or components.''' | ||
| − | == | + | ==Dragon A150 Gecko Drive Adjustment Instructions== |
| − | + | '''If you are having concerns with the smoothness related to motor functions on the Dragon Machine, the Gecko driver (which drives the motors) has a few select dials that can be adjusted in order to improve the efficiency of your machine.''' | |
| + | [[Gecko Drive Adjustment Instructions]] | ||
| + | |||
| + | ==Plasma Gas Selection== | ||
| + | *'''Select the [[Plasma Gas Selection Information]] link for detailed information showing what advantages and disadvantages there are to working with gasses in your plasma torch. | ||
| + | |||
| + | ==Air Filter System== | ||
| + | '''Do I need a separate air filter for my air plasma system?''' | ||
| + | The cut quality, performance, and consumable life of any air plasma system are directly impacted by the quality of the air going into it. Not only is it important to make sure you have enough air; you also need to make sure the air you have is clean and dry. This is especially important in areas with humid weather, as this excess moisture will easily make its way into your air compressor tank and air lines. | ||
| + | If this should be the case, we suggest draining your tank at least once a day or better yet, installing an automatic drain system. In addition, you may want to add a second filter (in addition to the filter already inside your plasma unit) at least 20 feet downstream of the compressor, to help collect some of this moisture. If you plan to use your system a lot – in a production environment, for example – or live in an area with extreme humidity, then you may need to use a refrigerated air dryer or desiccant filter system to remove moisture. | ||
| + | |||
| + | |||
| + | ==Marker Slippage/Inconsistent Placement== | ||
[[File:Marker_Holder_Tip1.png]] | [[File:Marker_Holder_Tip1.png]] | ||
| + | |||
| + | Sometimes the markers placed in the marker holder slip freely and fall out of the holder. Other times they get jammed up into the holder and are impossible to remove. ''We recommend a black or silver Sharpie for this.'' If the silver Sharpie still slips out of its holder, wrap the marker in tape (we use duct tape, but any tape will do) to ensure that it is held securely in the marker holder. | ||
| + | |||
| + | '''Or''' | ||
| + | |||
| + | Simply flip the head of the marker holder to the other end of the cylinder and the opposing end should accommodate both black and silver Sharpies. | ||
| + | |||
| + | ==Marker Revival== | ||
| + | Sometimes the markers will dry out because they are marking close to a cut zone where the tubing is still hot from the plasma. This can dry out your markers in record time. To bring your dried out marker back to life, dip the tip in some rubbing alcohol and it will work as good as new. It is also smart to make sure that your tubing is wiped down before running the stick to make sure that the grease doesn't inhibit the marker's ability to show up well on the surface. | ||
| + | |||
| + | ==Engraver Maintenance== | ||
| + | To ensure that your engraver tip lasts as long as possible, we suggest that you invest in an airline oiler and install it in your air line as shown here. | ||
| + | |||
| + | [[File:Airline_Oiler_4_Engraver1.png]] | ||
| + | |||
| + | ==Engraver Tip Replacement== | ||
| + | [[File:Engraver_Tip_Replacements1.png]] | ||
| + | |||
| + | Sometimes, regardless of preventative maintenance measures taken, the engraver tip will be in need of replacement. In this case, this stylus tip can be purchased at the link available here. | ||
| + | |||
| + | http://www.centurytool.net/CA156963_Chicago_Pneumatic_Assembly_Stylus_Cp7_p/cptca156963.htm | ||
| + | |||
| + | |||
| + | |||
| + | |||
| + | |||
| + | |||
| + | |||
| + | ==Engraver Holder Silicone Rings Replacement== | ||
| + | |||
| + | *Top Ring: https://www.mcmaster.com/#1283n59/=1agx1v5 | ||
| + | |||
| + | *Bottom Ring: https://www.mcmaster.com/#1283n86/=1agx24g | ||
| + | |||
| + | |||
| + | [[File:Engraver_O_Rings_Replacement1.png]] | ||
| + | |||
| + | |||
| + | |||
| + | [[File:Engraver_O_Rings_Replacement2.png]] | ||
| + | |||
| + | ==Carbon Grounding Brush Replacement== | ||
| + | [[File:Carbon_Brushes_Replacements1.png]] | ||
| + | |||
| + | If you've put a significant amount of hours on the Dragon Machine, there may come a time when the carbon grounding brushes will need replacing. These can be purchased at the link available here. (Part ID# 65705K39) | ||
| + | |||
| + | https://www.mcmaster.com/#65705K39 | ||
| + | |||
| + | |||
| + | ==Chuck Spindle Cleanup== | ||
| + | [[File:Chuck_Spindle_Cleanup1.png]] | ||
| + | |||
| + | When Carbon Brushes go bad, or are no longer usable causing your plasma torch to misfire, or not continue to fire during operations, most likely the torch is arcing out and will be causing significant scarring on your chuck spindle inside the chuck housing. In this case, we suggest immediately replacing your Carbon Brushes (See above), but also cleaning off any of the scarring on the chuck spindle with emery cloth or a wire brush wheel. | ||
| + | |||
| + | [[File:Chuck_Spindle_Cleanup2.png]][[File:Chuck_Spindle_Cleanup3.png]] | ||
| + | |||
==Rail Maintenance== | ==Rail Maintenance== | ||
| − | + | Your Bend-Tech Dragon machine will require maintenance in is lifetime. The following is a small routine maintenance process that should be completed about once per week, or if you notice build up of grime or dirt on either the main rail or on the roller bearings of the chuck trolly. This process should take less than 10 minutes to complete. | |
'''Step 1)''' Send the chuck to the middle of the machine. (Either jog the machine to this location or manually move the chuck while the machine is off.) | '''Step 1)''' Send the chuck to the middle of the machine. (Either jog the machine to this location or manually move the chuck while the machine is off.) | ||
| Line 19: | Line 87: | ||
'''Step 5)''' Wipe down the section of the main rail that was covered by the trolly before the homing sequence. | '''Step 5)''' Wipe down the section of the main rail that was covered by the trolly before the homing sequence. | ||
| − | + | This will provide a clean working environment for the chuck trolly to roll on and will increase the life of the trolly bearings. | |
To ensure that your rail/beam remains in pristine condition and operates up to our standards, make sure to follow through with this process as needed. | To ensure that your rail/beam remains in pristine condition and operates up to our standards, make sure to follow through with this process as needed. | ||
| Line 25: | Line 93: | ||
==Frayed or Broken Z-Axis Cable== | ==Frayed or Broken Z-Axis Cable== | ||
| − | + | In the event of a fraying or broken z-axis chain/cable, the part must be replaced. This will require a careful and attentive read through of the instructions contained in the link below. | |
[[File:Pdf2.png|link=http://www.bendtechdragon.com/files/z_axis_cable_replacement_walkthrough.pdf]] '''[http://www.bendtechdragon.com/files/z_axis_cable_replacement_walkthrough.pdf Z-Axis Replacement Cable]''' | [[File:Pdf2.png|link=http://www.bendtechdragon.com/files/z_axis_cable_replacement_walkthrough.pdf]] '''[http://www.bendtechdragon.com/files/z_axis_cable_replacement_walkthrough.pdf Z-Axis Replacement Cable]''' | ||
| + | |||
| + | ==Anti-Chattering Retro Fit Assembly Manual== | ||
| + | In some cases with older model 21 foot machines, some operators have experienced excessive chattering on the X-travel which has led to jagged or wavy cuts. If this unfortunate phenomenon has been the case for you, we suggest that you contact us and we will send out a retrofit kit to resolve this issue. The assembly manual is located below. | ||
| + | |||
| + | [[File:Pdf2.png|link=http://www.bendtechdragon.com/files/anti_chatter_retrofit_assembly_manual.pdf]] '''[http://www.bendtechdragon.com/files/anti_chatter_retrofit_assembly_manual.pdf Anti-Chattering Retro Fit Assembly Manual]''' | ||
Latest revision as of 10:05, 1 December 2017
This page will discuss tips and hints that we've found useful for Dragon users who experience various difficulties with their machine and/or components.
Contents
- 1 Dragon A150 Gecko Drive Adjustment Instructions
- 2 Plasma Gas Selection
- 3 Air Filter System
- 4 Marker Slippage/Inconsistent Placement
- 5 Marker Revival
- 6 Engraver Maintenance
- 7 Engraver Tip Replacement
- 8 Engraver Holder Silicone Rings Replacement
- 9 Carbon Grounding Brush Replacement
- 10 Chuck Spindle Cleanup
- 11 Rail Maintenance
- 12 Frayed or Broken Z-Axis Cable
- 13 Anti-Chattering Retro Fit Assembly Manual
Dragon A150 Gecko Drive Adjustment Instructions
If you are having concerns with the smoothness related to motor functions on the Dragon Machine, the Gecko driver (which drives the motors) has a few select dials that can be adjusted in order to improve the efficiency of your machine.
Gecko Drive Adjustment Instructions
Plasma Gas Selection
- Select the Plasma Gas Selection Information link for detailed information showing what advantages and disadvantages there are to working with gasses in your plasma torch.
Air Filter System
Do I need a separate air filter for my air plasma system? The cut quality, performance, and consumable life of any air plasma system are directly impacted by the quality of the air going into it. Not only is it important to make sure you have enough air; you also need to make sure the air you have is clean and dry. This is especially important in areas with humid weather, as this excess moisture will easily make its way into your air compressor tank and air lines. If this should be the case, we suggest draining your tank at least once a day or better yet, installing an automatic drain system. In addition, you may want to add a second filter (in addition to the filter already inside your plasma unit) at least 20 feet downstream of the compressor, to help collect some of this moisture. If you plan to use your system a lot – in a production environment, for example – or live in an area with extreme humidity, then you may need to use a refrigerated air dryer or desiccant filter system to remove moisture.
Marker Slippage/Inconsistent Placement
Sometimes the markers placed in the marker holder slip freely and fall out of the holder. Other times they get jammed up into the holder and are impossible to remove. We recommend a black or silver Sharpie for this. If the silver Sharpie still slips out of its holder, wrap the marker in tape (we use duct tape, but any tape will do) to ensure that it is held securely in the marker holder.
Or
Simply flip the head of the marker holder to the other end of the cylinder and the opposing end should accommodate both black and silver Sharpies.
Marker Revival
Sometimes the markers will dry out because they are marking close to a cut zone where the tubing is still hot from the plasma. This can dry out your markers in record time. To bring your dried out marker back to life, dip the tip in some rubbing alcohol and it will work as good as new. It is also smart to make sure that your tubing is wiped down before running the stick to make sure that the grease doesn't inhibit the marker's ability to show up well on the surface.
Engraver Maintenance
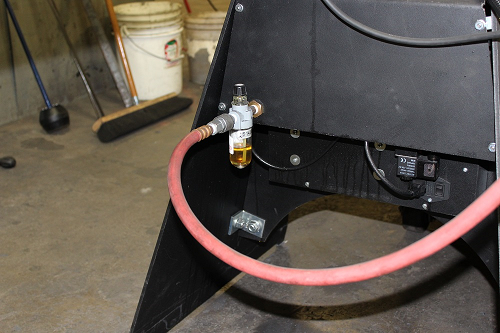
To ensure that your engraver tip lasts as long as possible, we suggest that you invest in an airline oiler and install it in your air line as shown here.
Engraver Tip Replacement
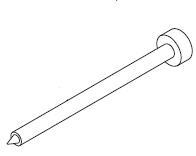
Sometimes, regardless of preventative maintenance measures taken, the engraver tip will be in need of replacement. In this case, this stylus tip can be purchased at the link available here.
http://www.centurytool.net/CA156963_Chicago_Pneumatic_Assembly_Stylus_Cp7_p/cptca156963.htm
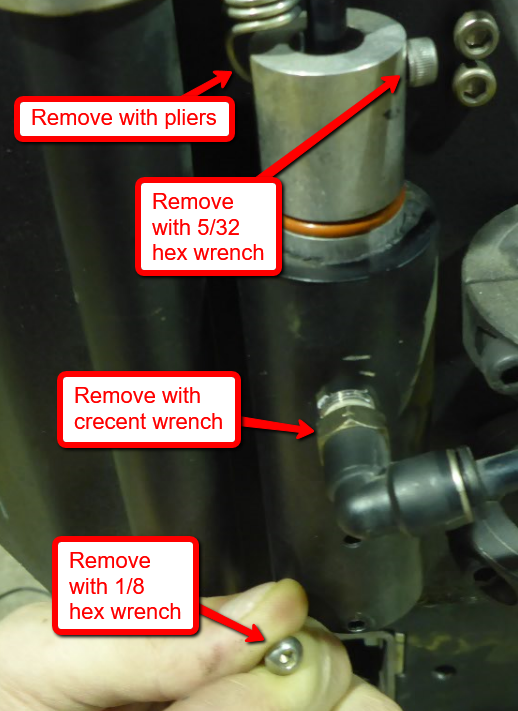
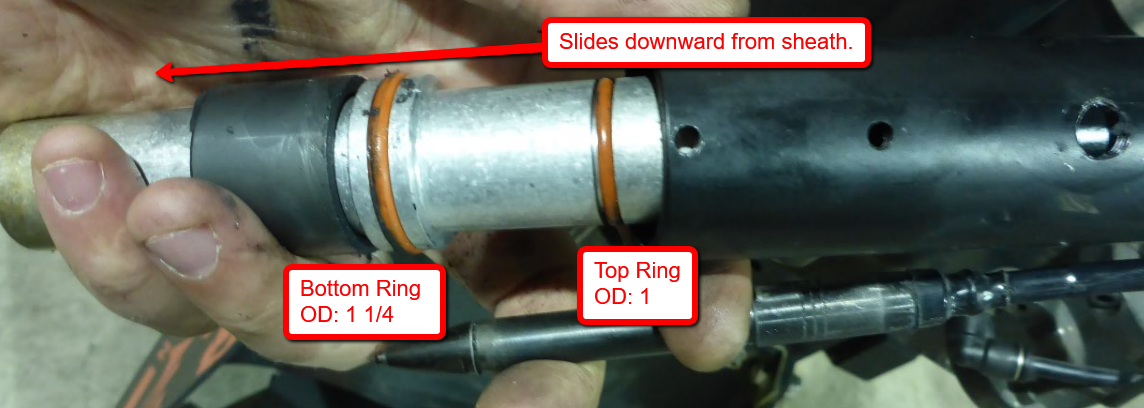
Engraver Holder Silicone Rings Replacement
- Bottom Ring: https://www.mcmaster.com/#1283n86/=1agx24g
Carbon Grounding Brush Replacement
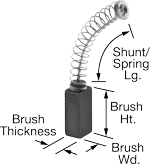
If you've put a significant amount of hours on the Dragon Machine, there may come a time when the carbon grounding brushes will need replacing. These can be purchased at the link available here. (Part ID# 65705K39)
https://www.mcmaster.com/#65705K39
Chuck Spindle Cleanup
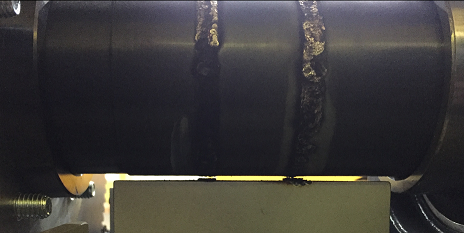
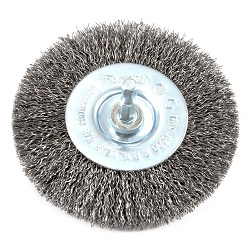
When Carbon Brushes go bad, or are no longer usable causing your plasma torch to misfire, or not continue to fire during operations, most likely the torch is arcing out and will be causing significant scarring on your chuck spindle inside the chuck housing. In this case, we suggest immediately replacing your Carbon Brushes (See above), but also cleaning off any of the scarring on the chuck spindle with emery cloth or a wire brush wheel.
Rail Maintenance
Your Bend-Tech Dragon machine will require maintenance in is lifetime. The following is a small routine maintenance process that should be completed about once per week, or if you notice build up of grime or dirt on either the main rail or on the roller bearings of the chuck trolly. This process should take less than 10 minutes to complete.
Step 1) Send the chuck to the middle of the machine. (Either jog the machine to this location or manually move the chuck while the machine is off.)
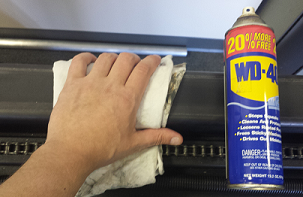
Step 2) Wipe down the entire reachable surface of the main rail. The section under the trolly will not be accessible during this step.
Step 3) Begin the homing sequence. (Click the "Ref All Home" button in your Mach software)
Step 4) During the homing sequence for the X Axis, carefully wipe off the roller bearings on the chuck trolly as they are rotating at this slow speed from the homing sequence. (They tend to accumulate grime and dirt during the operation of the machine.)
Step 5) Wipe down the section of the main rail that was covered by the trolly before the homing sequence.
This will provide a clean working environment for the chuck trolly to roll on and will increase the life of the trolly bearings. To ensure that your rail/beam remains in pristine condition and operates up to our standards, make sure to follow through with this process as needed.
Frayed or Broken Z-Axis Cable
In the event of a fraying or broken z-axis chain/cable, the part must be replaced. This will require a careful and attentive read through of the instructions contained in the link below.
Anti-Chattering Retro Fit Assembly Manual
In some cases with older model 21 foot machines, some operators have experienced excessive chattering on the X-travel which has led to jagged or wavy cuts. If this unfortunate phenomenon has been the case for you, we suggest that you contact us and we will send out a retrofit kit to resolve this issue. The assembly manual is located below.

