Difference between revisions of "Cutting Tutorial (Advanced)"
| Line 1: | Line 1: | ||
"'''UNDER CONSTRUCTION:THANKS FOR YOUR PATIENCE'''" | "'''UNDER CONSTRUCTION:THANKS FOR YOUR PATIENCE'''" | ||
| − | This tutorial shows the user how to create cutting sleeves for complex part intersections. It is recommended that you complete the basic [[Cutting Tutorial]] before starting this | + | '''This tutorial shows the user how to create cutting sleeves for complex part intersections. It is recommended that you complete the basic [[Cutting Tutorial]] before starting this advanced version.''' |
| − | ''Note | + | ''(Note) Inches are used as the measurement units throughout this tutorial.'' |
__NOTOC__ | __NOTOC__ | ||
| − | |||
| − | |||
[[File:cut_tut_01.png|right|500px]] | [[File:cut_tut_01.png|right|500px]] | ||
| − | + | ==Things To Know== | |
| − | |||
| − | |||
| − | |||
| − | |||
| − | |||
| − | |||
| − | |||
| − | |||
| − | |||
| + | *"''This tutorial is designed to walk the user through creating an assembly design and cutting parts to fit together. As you go through this tutorial, later procedures will assume that you understand all earlier procedures. Because of this, it is very important that you carefully step through this guide, understanding everything along the way and following all steps in order.''" | ||
| + | *"'''A few key items need to be addressed before starting the step-by-step instructions of this tutorial. It is very important for Bend-Tech users to completely understand these items:'''" | ||
| + | ;1) [[PickPoints]] | ||
| + | :PICKPOINTS ARE USED FOR EVERYTHING. The Assembly part of the software is largely run in full 3D. Because a computer screen is only 2D, there is an unlimited amount of depth behind and in front of the cursor. A PickPoint is a point in 3D space that can be used for creating, editing, and placing parts in handrail design. PickPoints can be placed in a 2D environment by having their depth manually entered in the appropriate value fields. | ||
| + | :*There are 2 types of PickPoints; Those automatically created by the part by default (various colors) and user-defined points (green). In addition, the initial (0,0,0) point is an automatic point that resides at the center of the Tri-Star. The Tri-Star is our directional definition locator. | ||
| + | ;2) Center Line & Apex | ||
| + | :*Center Line: In the assembly design environment we are not working ''exclusively'' with the "'''center-line'''" of a part, but rather more with the inside or outside. | ||
| + | :*Apex: Most bend locations are created in handrail design with the "'''Apex'''". Our definition of apex is the intersection of the straight tubes as if there wasn’t a radius. | ||
| + | :This is demonstrated in the picture below. | ||
| + | [[File:W5.PNG]] | ||
| + | ;3) Locational Orientation | ||
| + | :*Designing seems to work the best if users imagine as if they are standing at a 45 degree angle to the desired creation. This way left is left and right is right. Take a minute and examine the Tri-Star (under the [[PickPoints]]] tab) to get your orientation. | ||
| + | ==Start Up== | ||
| + | 1) Start by double clicking the "'''Bend-Tech 7x'''" icon to start up the program.[[File:Bend_tech_icon.png]][[File:Material_Die.png|right]] | ||
| + | 2) Select the "'''Assembly'''" icon [[File:newassembly.png]] in the [[Task Menu]] under the "'''Create New'''" section to open the Assembly interface. The window that opens should be labeled [Assembly - 1]. | ||
| + | 3) For the purposes of this tutorial, click the "'''Maximize'''" button [[File:Min_Max_Close_Tab.png]] at the top right of the Assembly window. | ||
| + | 4) Also, for the purposes of this tutorial, zoom out significantly by spinning the wheel on your mouse so that the Tri-star is about the size of a pea in the lower left corner of the display area. | ||
| + | 5) For the purposes of this tutorial. The "'''Die & Material'''" tab is located in the upper left corner of the window. Select the "'''1.00 Material'''" and "'''2.0 Die'''" as seen here. | ||
| + | ==Part Design== | ||
| − | |||
[[File:cut_tut_02.png|left|300px]] | [[File:cut_tut_02.png|left|300px]] | ||
Revision as of 13:05, 17 September 2014
"UNDER CONSTRUCTION:THANKS FOR YOUR PATIENCE" This tutorial shows the user how to create cutting sleeves for complex part intersections. It is recommended that you complete the basic Cutting Tutorial before starting this advanced version.
(Note) Inches are used as the measurement units throughout this tutorial.
Things To Know
- "This tutorial is designed to walk the user through creating an assembly design and cutting parts to fit together. As you go through this tutorial, later procedures will assume that you understand all earlier procedures. Because of this, it is very important that you carefully step through this guide, understanding everything along the way and following all steps in order."
- "A few key items need to be addressed before starting the step-by-step instructions of this tutorial. It is very important for Bend-Tech users to completely understand these items:"
- 1) PickPoints
- PICKPOINTS ARE USED FOR EVERYTHING. The Assembly part of the software is largely run in full 3D. Because a computer screen is only 2D, there is an unlimited amount of depth behind and in front of the cursor. A PickPoint is a point in 3D space that can be used for creating, editing, and placing parts in handrail design. PickPoints can be placed in a 2D environment by having their depth manually entered in the appropriate value fields.
- There are 2 types of PickPoints; Those automatically created by the part by default (various colors) and user-defined points (green). In addition, the initial (0,0,0) point is an automatic point that resides at the center of the Tri-Star. The Tri-Star is our directional definition locator.
- 2) Center Line & Apex
-
- Center Line: In the assembly design environment we are not working exclusively with the "center-line" of a part, but rather more with the inside or outside.
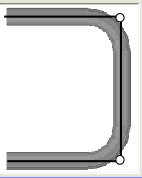
- Apex: Most bend locations are created in handrail design with the "Apex". Our definition of apex is the intersection of the straight tubes as if there wasn’t a radius.
- This is demonstrated in the picture below.
- 3) Locational Orientation
-
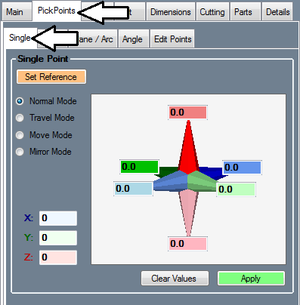
- Designing seems to work the best if users imagine as if they are standing at a 45 degree angle to the desired creation. This way left is left and right is right. Take a minute and examine the Tri-Star (under the PickPoints] tab) to get your orientation.
Start Up
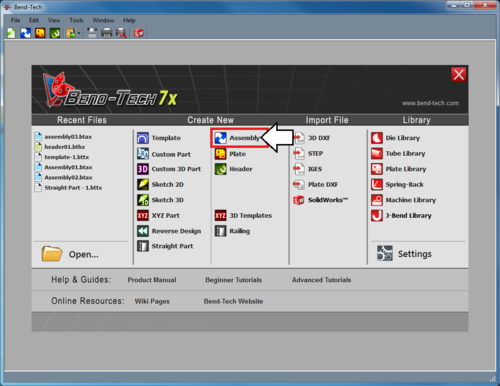
1) Start by double clicking the "Bend-Tech 7x" icon to start up the program.2) Select the "Assembly" icon ![]() in the Task Menu under the "Create New" section to open the Assembly interface. The window that opens should be labeled [Assembly - 1].
in the Task Menu under the "Create New" section to open the Assembly interface. The window that opens should be labeled [Assembly - 1].
3) For the purposes of this tutorial, click the "Maximize" button ![]() at the top right of the Assembly window.
at the top right of the Assembly window.
4) Also, for the purposes of this tutorial, zoom out significantly by spinning the wheel on your mouse so that the Tri-star is about the size of a pea in the lower left corner of the display area.
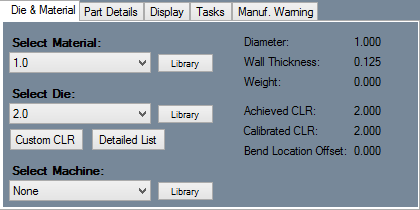
5) For the purposes of this tutorial. The "Die & Material" tab is located in the upper left corner of the window. Select the "1.00 Material" and "2.0 Die" as seen here.
Part Design
Before we start, we need to put a few parts together so that we have something to cut.
Go to the PickPoints tab and the Single sub-tab.
Step 3
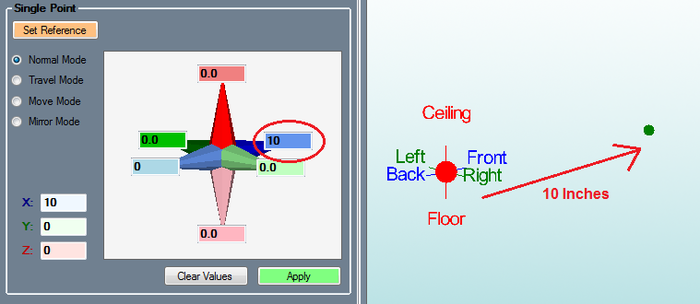
Click the Set Reference button ![]() and click the point at the center of the Tri-Star (this should be the only point on the screen right now). If you successfully select the point, it will turn red.
and click the point at the center of the Tri-Star (this should be the only point on the screen right now). If you successfully select the point, it will turn red.
Enter 10 in the darker blue Front field and click Apply. ![]()
Step 4
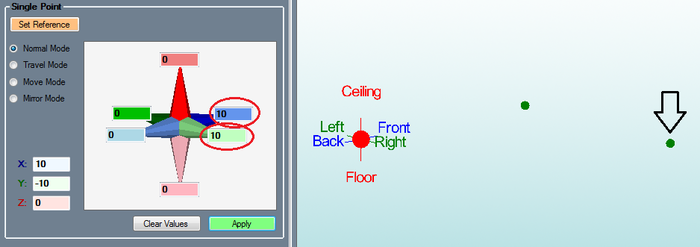
Click the Clear Values button.
Enter 10 in the darker blue Front field and 10 in the light green Right field.
Click the Apply button.
Step 5
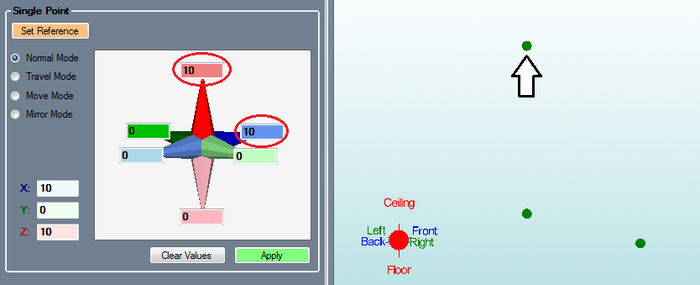
Click the Clear Values button.
Enter 10 in the darker blue Front field and 10 in the darker red Ceiling field.
Click the Apply button.
Step 6
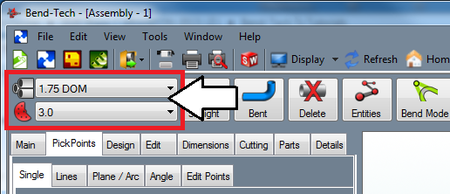
Select a material in the upper left corner of the assembly window. (Note: If there are no materials available, one will need to be created. Refer to the Tube/Pipe Library page for information on how to define tube materials.)
Select a die as well, in the upper left corner, below the material menu.
Step 7
This part will only have 1 bend so click the OK button in the Number of Bends window.
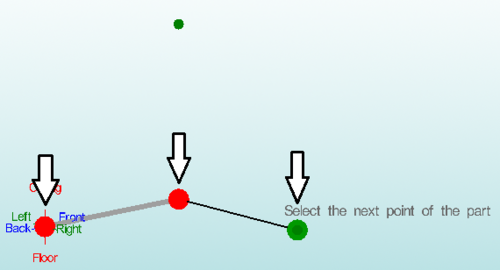
Click the point at the center of the Tri-Star, followed by the first two points we made in the order that we made them.
Click the OK button in the Part Name window.
Step 8
Click the Straight Part button. 
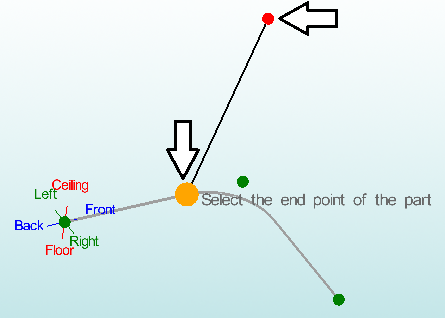
Click the top point, followed by the orange/yellow point on the left side of the bend.
Step 9
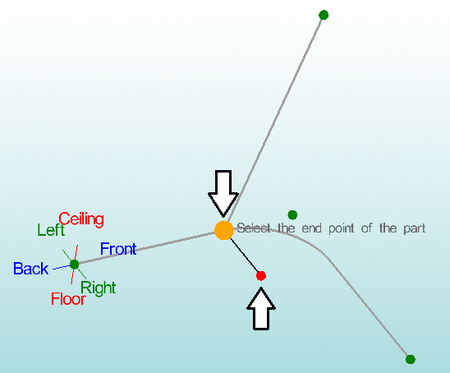
Click the light blue colored point at the center of the arc on the display window, followed by the orange/yellow point at the end of the previous part to create the second straight part.
Step 10
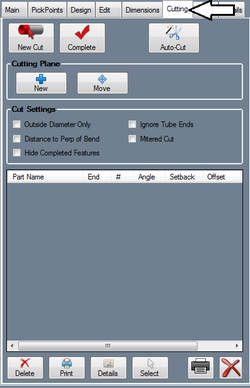
Go to the Cutting tab.
Step 11
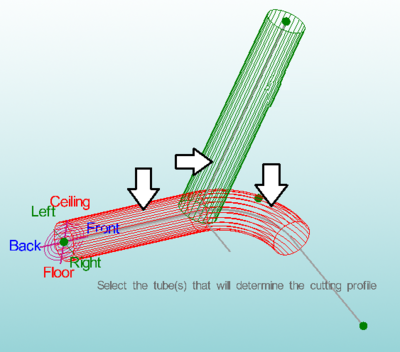
First, click on the top tube, then click on the bottom two tubes below on either side of the first tubes end.
When you are placing cuts, you must first select the section of tube that you want to cut (highlighted green), then any tubes that the first tube should be cut to (highlighted red).
Notice how you had to make two selections for the same part (bottom two). You can only select sections of parts during cutting, so bent parts will need to have their bends and straight sections selected separately.
Step 12
The cut will then be added to the cut list.
Zoom in on the part model to see a better view of the cut outline. The cutting profile will be represented by the blue and black lines.
Step 13
Now click the New Cut button ![]() again.
again.
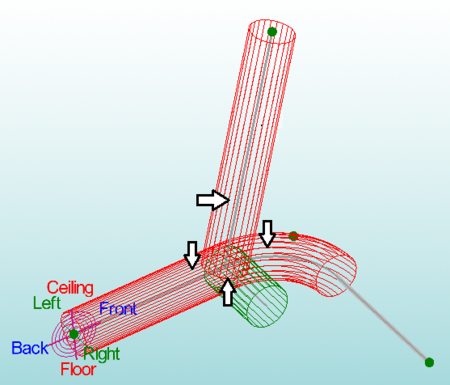
Click the section closest to the intersection on the small straight part. Then select the lower section of the top tube, and the two sections on either side of the intersection.
Step 14
The cut will then be added to the cut list.
Zoom in on the part model to see a better view of the cut outline. The cutting profile will be represented by the blue and black lines.
Step 15
You are now finished adding cuts to the part.
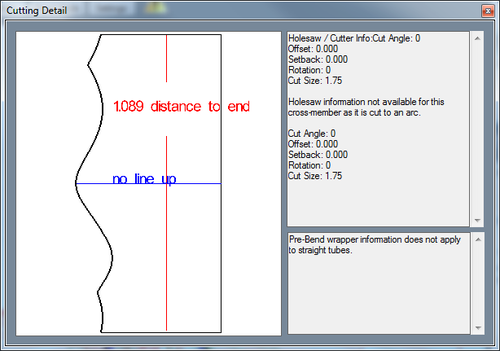
To see a preview of the cutting wrapper (shown to the right), click the Details ![]() below the cut list.
below the cut list.
If you wanted to print out cutting sleeves for both cuts, you could do so by clicking the Print All button ![]() below the cut list.
below the cut list.
