Difference between revisions of "Industrial"
| Line 34: | Line 34: | ||
===Material Definition=== | ===Material Definition=== | ||
[[File:Select_Material1.png]] | [[File:Select_Material1.png]] | ||
| + | |||
1. The '''Select Material:''' drop down menu will be grayed out until the user has fully tracked the imported part. Once the part is tracked, it will need to be assigned a material which matches its '''Defined:''' outer diameter and wall thickness. | 1. The '''Select Material:''' drop down menu will be grayed out until the user has fully tracked the imported part. Once the part is tracked, it will need to be assigned a material which matches its '''Defined:''' outer diameter and wall thickness. | ||
| + | |||
[[File:Outer_Diameter1.png]] | [[File:Outer_Diameter1.png]] | ||
| + | |||
[[File:Wall_Thickness1.png]] | [[File:Wall_Thickness1.png]] | ||
Revision as of 11:00, 9 September 2015
UNDER CONSTRUCTION: THANK YOU FOR YOUR PATIENCE
"Bend-Tech Industrial comes equipped with all of the functionality available in our SE product along with the following."
Importing
"NOTE: All parts that are brought into Bend-Tech Industrial must be in either .STEP/.stp or .IGES/.igs format."
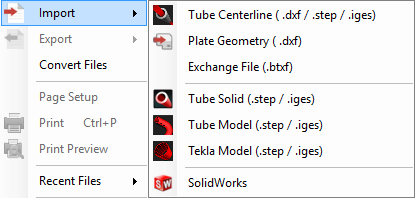
2. Choose a file to import by using the standard method. Go up to the File menu at the top left hand corner of the screen, select the Import option and choose from either Solid Model (.step/.stp), STEP (.step/.stp) or IGES (.IGES/.igs) from the list depending on which file format you'd like to import.
Defining The Part
Color Code
1. After importing a solid model, the part will appear with contoured lines, arcs and circles. These are color coded to help you to identify certain sections of the tubing.
Material Definition
1. The Select Material: drop down menu will be grayed out until the user has fully tracked the imported part. Once the part is tracked, it will need to be assigned a material which matches its Defined: outer diameter and wall thickness.


