Difference between revisions of "Parts"
(Created page with "== Description == The Parts tab contains a list of all parts in the current Assembly project and tools that can be used to edit them. == How-To == Click on a part in the pa...") |
|||
| Line 1: | Line 1: | ||
| − | + | '''[[Main Page|Bend-Tech 7x Wiki]] :: [[Assembly]] :: Parts''' | |
| + | __NOTOC__ | ||
| + | [[File:assembly_parts.png|right]] | ||
| + | |||
The Parts tab contains a list of all parts in the current Assembly project and tools that can be used to edit them. | The Parts tab contains a list of all parts in the current Assembly project and tools that can be used to edit them. | ||
| − | |||
| − | Click on a part in the part list to select it. Use the drop down menu in the Die column to change the die for that part or use the drop down in the Material column to change the material. Click on the colored box in the Color column to change the parts color using the | + | |
| + | Click on a part in the part list to select it. Once a part is selected in the list, it will be highlighted in yellow. Parts can also be selected by clicking directly on a part in the assembly. | ||
| + | |||
| + | Use the drop down menu in the '''Die''' column to change the die for that part or use the drop down in the '''Material''' column to change the material. | ||
| + | |||
| + | Click on the colored box in the '''Color''' column to change the parts color using the color menu. | ||
| + | |||
| + | Click the '''Print''' icon to print a picture of the currently view of the assembly. | ||
| + | |||
| + | |||
| + | '''Double click''' on this table to open it in a separate window. Click the '''Print''' button to print this chart. | ||
| + | |||
| + | [[File:parts_2.png|600px]] | ||
Revision as of 11:07, 10 June 2014
Bend-Tech 7x Wiki :: Assembly :: Parts
The Parts tab contains a list of all parts in the current Assembly project and tools that can be used to edit them.
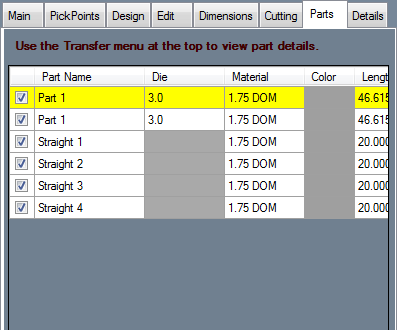
Click on a part in the part list to select it. Once a part is selected in the list, it will be highlighted in yellow. Parts can also be selected by clicking directly on a part in the assembly.
Use the drop down menu in the Die column to change the die for that part or use the drop down in the Material column to change the material.
Click on the colored box in the Color column to change the parts color using the color menu.
Click the Print icon to print a picture of the currently view of the assembly.
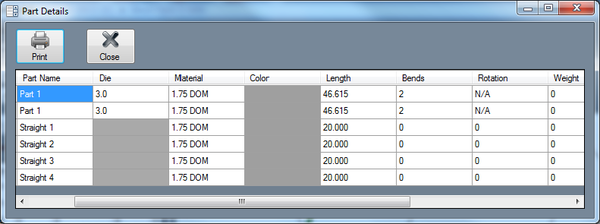
Double click on this table to open it in a separate window. Click the Print button to print this chart.

