Difference between revisions of "Print Scale"
| Line 6: | Line 6: | ||
| − | *'''Margins:''' | + | *'''Margins:''' The margins of each individual page can be set here in terms of inches. |
| Line 15: | Line 15: | ||
| − | *'''Line Width:''' | + | *'''Line Width:''' The width of the line representing the part features can be adjusted here. Smaller values will result in thinner lines while larger numbers will result in thicker lines. |
| Line 24: | Line 24: | ||
| − | *'''Print Options:''' | + | *'''Print Options:''' |
| − | :[[File:printscale_2.png|left]] | + | :[[File:printscale_2.png|left]] Select Printer: Choose which printer to print from here. |
| + | |||
| + | Number of Copies: The number of copies to print can be specified here. | ||
| + | |||
| + | Print Preview: Check this box to have a preview of the pages shown before it is printed. | ||
| + | |||
| + | Print to File: Check this box to save the pages as a Printer File (.prn). | ||
| + | |||
| + | Print Page Numbers: Check this box to print page numbers on each page. | ||
| + | |||
| + | Print Edge Lines: | ||
Revision as of 11:23, 4 June 2014
Bend-Tech 7x Wiki :: Single Part -Interface/General Functions :: Print Scale
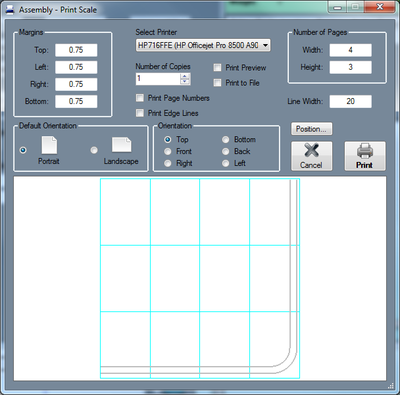
Print Scale allows a full size, to scale, 2D version of single part designs to be printed to scale on multiple sheets. Each printed page will display one section of the full size part. When these pages are all combined, they will show the entire part design.
- Margins: The margins of each individual page can be set here in terms of inches.
- Default Orientation: The orientation of the pages can be adjusted here by choosing either portrait or landscape.
- Number of Pages: The width and height of the block of pages can be adjusted here. A preview of what the full group will be shown below. Each page is represented by a light blue outline.
- Line Width: The width of the line representing the part features can be adjusted here. Smaller values will result in thinner lines while larger numbers will result in thicker lines.
- Orientation: The angle that the part printout will be viewed from can be chosen here.
- Position... : To reposition the part outline on the pages, click the Position... button.
 The part outline will be attached to the cursor. Click to place the part in a new location. Keep in mind, if any of the part extends past the edge of the pages,
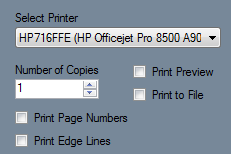
- Print Options:
- Select Printer: Choose which printer to print from here.
Number of Copies: The number of copies to print can be specified here.
Print Preview: Check this box to have a preview of the pages shown before it is printed.
Print to File: Check this box to save the pages as a Printer File (.prn).
Print Page Numbers: Check this box to print page numbers on each page.
Print Edge Lines:
- Preview:

