Difference between revisions of "Die References"
| Line 3: | Line 3: | ||
Select a die from the die references list and your reference details for that die will be displayed in the '''Reference Details''' section to the right. If no dies are available from the die references list, you will click the '''Add New''' button from below and add the die from your '''[[Die Library]]''' before setting up the references. | Select a die from the die references list and your reference details for that die will be displayed in the '''Reference Details''' section to the right. If no dies are available from the die references list, you will click the '''Add New''' button from below and add the die from your '''[[Die Library]]''' before setting up the references. | ||
| − | <h2>Reference Details</ | + | <h2>Reference Details</h2> |
| + | This section will show the name of the die, material associated with that die, bend radius min, bend radius max, assigned die and units of measurement. | ||
| + | |||
| + | ===Name:=== | ||
| + | Enter the name for the die and/in addition to the associated material size and type here. | ||
| + | |||
| + | ===Material:=== | ||
| + | Select the material associated with the die from this drop down menu. | ||
| + | |||
| + | ===Bend Radius (Min):=== | ||
| + | Enter the value for the minimum bend radius that the software will accept to apply this die when importing a new design. | ||
| + | |||
| + | ===Bend Radius (Max):=== | ||
| + | Enter the value for the maximum bend radius that the software will accept to apply this die when importing a new design. | ||
| + | |||
| + | ===Assigned Die:=== | ||
| + | Choose the die that will be assigned when the imported part detects a CLR within the previously added bend radius allowances. | ||
| + | |||
| + | <h2>Units</h2> | ||
| + | Choose the units of measurement (Inches or Millimeters) for the associated imported CLR information. | ||
| + | |||
| + | <h2>Action Buttons</h2> | ||
| + | This section contains buttons for adding a new die to the references list, deleting an existing die from the references list, save the current information and close the window. | ||
| + | |||
| + | ===Add New=== | ||
| + | Click the Add New button in order to add a new die to the references list. | ||
| + | |||
| + | ===Delete=== | ||
| + | Click the Delete button in order to delete the selected die from the die references list. | ||
| + | |||
| + | ===Save=== | ||
| + | Click the Save button in order to save the progress of your added and deleted dies from the die references list. | ||
| + | |||
| + | ===Close=== | ||
| + | Click the Close button to close the window. | ||
Latest revision as of 10:57, 18 December 2015
Contents
Die References List
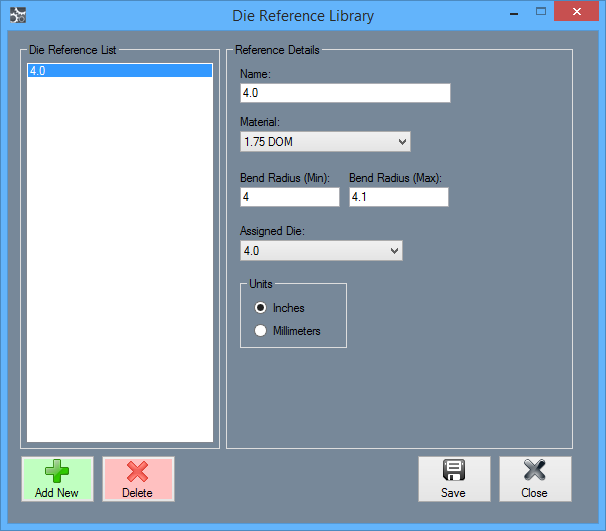
Select a die from the die references list and your reference details for that die will be displayed in the Reference Details section to the right. If no dies are available from the die references list, you will click the Add New button from below and add the die from your Die Library before setting up the references.
Reference Details
This section will show the name of the die, material associated with that die, bend radius min, bend radius max, assigned die and units of measurement.
Name:
Enter the name for the die and/in addition to the associated material size and type here.
Material:
Select the material associated with the die from this drop down menu.
Bend Radius (Min):
Enter the value for the minimum bend radius that the software will accept to apply this die when importing a new design.
Bend Radius (Max):
Enter the value for the maximum bend radius that the software will accept to apply this die when importing a new design.
Assigned Die:
Choose the die that will be assigned when the imported part detects a CLR within the previously added bend radius allowances.
Units
Choose the units of measurement (Inches or Millimeters) for the associated imported CLR information.
Action Buttons
This section contains buttons for adding a new die to the references list, deleting an existing die from the references list, save the current information and close the window.
Add New
Click the Add New button in order to add a new die to the references list.
Delete
Click the Delete button in order to delete the selected die from the die references list.
Save
Click the Save button in order to save the progress of your added and deleted dies from the die references list.
Close
Click the Close button to close the window.
