Difference between revisions of "How To Use Cutting Wrappers"
m (Fabcam1 moved page Line Up the Templates to How To Use Cutting Wrappers) |
BT-JAnderson (talk | contribs) |
||
| Line 1: | Line 1: | ||
| − | ''' | + | == '''Intro''' == |
| − | + | Once an assembly is designed in the Bend-Tech software, cutting wrappers can be printed for each end cut. | |
| − | + | Navigate to the <CUTTING TAB>. Select the part you want to print a wrapper for and click <PRINT> to print wrappers for the selected end cut or click <PRINT ALL> to print wrappers for all the end cuts. | |
| + | Carefully cut out each wrapper along the black line. | ||
| − | There are | + | There are three types of Cut Wrappers. |
| + | • Straight Tube – one end cut | ||
| + | • Straight Tube – both end cuts | ||
| + | • Bent Tube – either end cut | ||
| − | + | Cut Wrappers are printed with a red Location Line and a blue Rotation Line. Bend Cut Wrappers will include arrow marks that point towards the scrap material. | |
| − | |||
| − | ''' | + | == '''Straight Tube – one end cut''' == |
| + | Place the Location Line (red line) at the distance indicated on the wrapper, measured from the opposite end of the tube. | ||
| − | + | The Rotation Line (blue) is not used for this style of wrapper. | |
| − | [[File: | + | [[File:StraightTube_CuttingWrapper_1.png|800px]] |
| − | + | == '''Straight Tube – both ends cut''' == | |
| − | + | Each cut wrapper will have two measurements. The first measurement is the distance to the Location (red) line of the second wrapper. The second measurement is the distance to from the end of the tube. | |
| + | Position the wrappers at the correct distance apart and ensure that the Rotation (blue) lines line up with each other. | ||
| + | [[File:StraightTube_CuttingWrapper_2.png|800px]] | ||
| − | ''' | + | == '''Bent Part - either end cut''' == |
| − | + | Bend cut wrappers contain one or more wrappers and a Distance Along Bend printout. Bend cut wrappers with multiple cut path wrappers are applied in numerical order outwards from the distance mark. The number of wrappers used for a cut is calculated from the Bend Degrees per Chunk. To change this value, click <DETAILS> and enter the new number. By default, this is set to 10 degrees per Chunk (or wrapper). A lower number is useful for large radius bends. Bend-Tech does not recommend increasing this number above 10 degrees. | |
| − | + | Tape the Distance Along Bend printout along the outside radius (arc) of the bend. The Start Cut distance is measured from the end of the bend, and the End Cut distance is measured from the start of the bend. | |
| + | '''''Note: The Distance Along Bend printout is positioned so that it lines up with the start of the bend and the end of the bend.''''' | ||
| − | + | Apply the cut wrappers at the end of the distance print out. Ensure the Rotation (blue) lines are aligned. Position the wrappers so that the arrows point towards the scrap material. | |
| − | [[File: | + | [[File:Bent_Tube.png|400px]] [[File:BentTube_CuttingWrapper_1.png|600px]] |
| + | Bend cut wrappers with multiple cut path wrappers are applied in numerical order outwards from the distance mark. | ||
| − | + | [[File:BentTube_CuttingWrapper_2.png|600px]] | |
| − | |||
| − | |||
| − | |||
| − | |||
| − | |||
| − | |||
| − | |||
| − | |||
| − | |||
| − | |||
| − | |||
| − | |||
| − | |||
| − | [[File: | ||
Latest revision as of 14:25, 24 January 2023
Contents
Intro
Once an assembly is designed in the Bend-Tech software, cutting wrappers can be printed for each end cut.
Navigate to the <CUTTING TAB>. Select the part you want to print a wrapper for and click <PRINT> to print wrappers for the selected end cut or click <PRINT ALL> to print wrappers for all the end cuts.
Carefully cut out each wrapper along the black line.
There are three types of Cut Wrappers.
    • Straight Tube – one end cut
    • Straight Tube – both end cuts
    • Bent Tube – either end cut
Cut Wrappers are printed with a red Location Line and a blue Rotation Line. Bend Cut Wrappers will include arrow marks that point towards the scrap material.
Straight Tube – one end cut
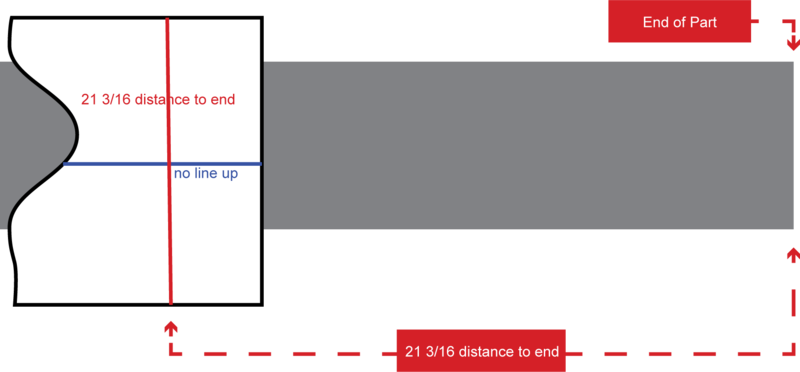
Place the Location Line (red line) at the distance indicated on the wrapper, measured from the opposite end of the tube.
The Rotation Line (blue) is not used for this style of wrapper.
Straight Tube – both ends cut
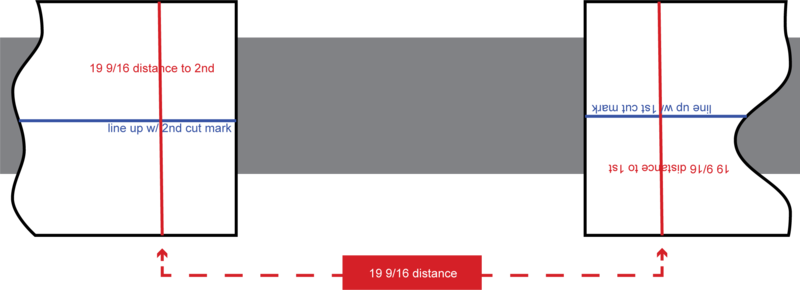
Each cut wrapper will have two measurements. The first measurement is the distance to the Location (red) line of the second wrapper. The second measurement is the distance to from the end of the tube. Position the wrappers at the correct distance apart and ensure that the Rotation (blue) lines line up with each other.
Bent Part - either end cut
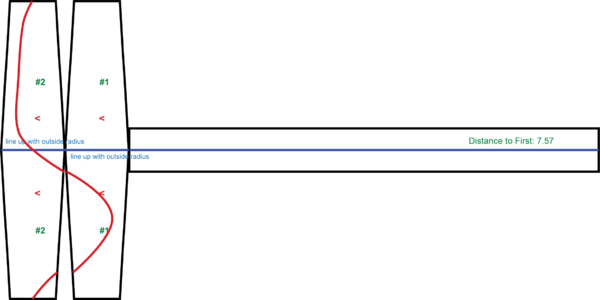
Bend cut wrappers contain one or more wrappers and a Distance Along Bend printout. Bend cut wrappers with multiple cut path wrappers are applied in numerical order outwards from the distance mark. The number of wrappers used for a cut is calculated from the Bend Degrees per Chunk. To change this value, click <DETAILS> and enter the new number. By default, this is set to 10 degrees per Chunk (or wrapper). A lower number is useful for large radius bends. Bend-Tech does not recommend increasing this number above 10 degrees.
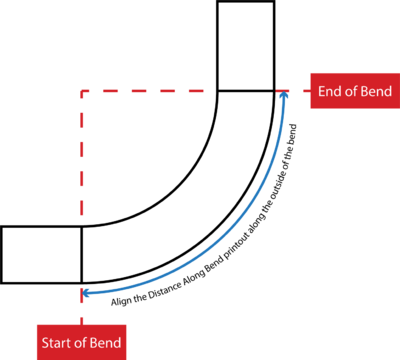
Tape the Distance Along Bend printout along the outside radius (arc) of the bend. The Start Cut distance is measured from the end of the bend, and the End Cut distance is measured from the start of the bend.
Note: The Distance Along Bend printout is positioned so that it lines up with the start of the bend and the end of the bend.
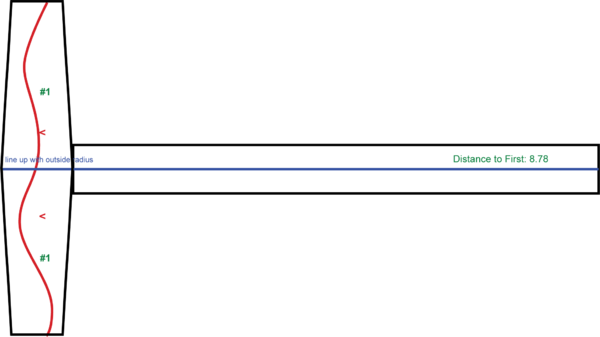
Apply the cut wrappers at the end of the distance print out. Ensure the Rotation (blue) lines are aligned. Position the wrappers so that the arrows point towards the scrap material.
Bend cut wrappers with multiple cut path wrappers are applied in numerical order outwards from the distance mark.
