Bend Order/Simulation
The Bend Order options and Bending Simulation section is located in every Single Part Interface under the Part Display tab.
- Select the "Bend Order" button
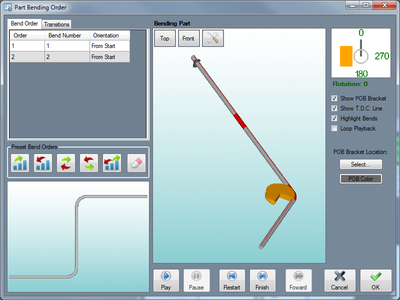
 to access the Part Bending Order menu. In this window users can view their part being bent in a simulation. This window also contains settings and bending options. See the Bend Order page for further information on this feature.
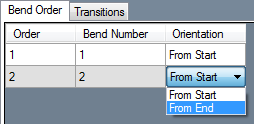
In the top right corner there is a tabbed section that holds the Bend Order and Transitions tabs. Under Bend Order, the bend order, number, and orientation can be viewed.
To change the bend number or orientation, click on the number or orientation and selected an option from the drop down menu.
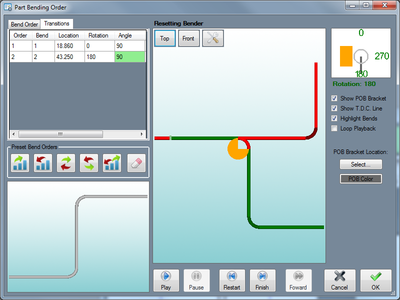
Under the Transitions tab, the bend order, number, location, rotation amount, and bend angle are shown. Click on a location, rotation, or angle to view what the part will look like while bending at the selected location, rotation or angle. The part preview will display the 'before' version of the part in red and the 'after' the selected motion in green.
Below the tabbed section, there is a 3D preview of the finished part. This preview can be rotated, panned, and zoomed in/out. To zoom, use the mouse scroll wheel. Scroll up to zoom out and scroll down to zoom in. To pan/move the part around, click and hold the scroll wheel or both mouse buttons down. The part will move with the cursor's movements. To rotate the part, click and hold the right mouse button and move the cursor around. The part will rotate with the cursor movements.
Below the tabbed section, under the Preset Bend Orders heading are the bend order buttons.
Click the Normal Order button ![]() to set the bend order to the standard from first to last bend. The bending process will start at the first bend and end at the last bend. Each bend will be bent starting at the beginning/start of the bend.
to set the bend order to the standard from first to last bend. The bending process will start at the first bend and end at the last bend. Each bend will be bent starting at the beginning/start of the bend.
Click the Reverse Order button ![]() to completely reverse the order of the bends. The bending process will start with the last bend and end with the first. Each bend will be bent starting from the end of the bend.
to completely reverse the order of the bends. The bending process will start with the last bend and end with the first. Each bend will be bent starting from the end of the bend.
Click the Normal Flip button ![]() to flip the order of bending between two specified bends. After clicking, select which bends to flip between from the drop down menu and click 'OK'. This will cause the bend order to completely flip between the specified bends. For example, if '3&4' is chosen, the bend order will go in order and bend from the start of the bend up to bend three. After bend three, the order goes in reverse order and the bend's are bent from the end of the bend.
to flip the order of bending between two specified bends. After clicking, select which bends to flip between from the drop down menu and click 'OK'. This will cause the bend order to completely flip between the specified bends. For example, if '3&4' is chosen, the bend order will go in order and bend from the start of the bend up to bend three. After bend three, the order goes in reverse order and the bend's are bent from the end of the bend.
Click the Opposite Flip button ![]() to reverse the orientation of the bends between two specified bends. After clicking, select which bends to flip between from the drop down menu and click 'OK'. This will cause the bend orientation to completely flip between the chosen bends. The bend order will remain normal, but the orientation will switch from 'From Start' to 'From End' between the bends.
to reverse the orientation of the bends between two specified bends. After clicking, select which bends to flip between from the drop down menu and click 'OK'. This will cause the bend orientation to completely flip between the chosen bends. The bend order will remain normal, but the orientation will switch from 'From Start' to 'From End' between the bends.
Click the Center Out button ![]() to start the bend order at the center and work towards start/end. Once the button is clicked, a message box will appear. Click the drop down menu and choose which bends bend order will be split between. The bend order will go in reverse order starting between the two chosen bends working to the start of the part bending each bend from the end of the bend. After the first bend on the part is complete, the bend order will return to normal and work towards the end of the part bending each bend from the start of the bend.
to start the bend order at the center and work towards start/end. Once the button is clicked, a message box will appear. Click the drop down menu and choose which bends bend order will be split between. The bend order will go in reverse order starting between the two chosen bends working to the start of the part bending each bend from the end of the bend. After the first bend on the part is complete, the bend order will return to normal and work towards the end of the part bending each bend from the start of the bend.
Click the Clear Order button ![]() to completely clear out the bend order and transitions.
to completely clear out the bend order and transitions.
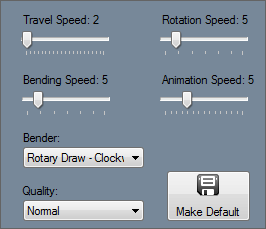
At the top of the simulation frame there is the Simulations Settings section. To access these settings, click on the Settings button. ![]() To change the travel, bending, rotation, or animation speed, click and hold the slider and drag it back and forth to adjust the speed. To change which bender used in the simulation, select a bender from the drop down menu below 'Bender:'. To adjust the quality of the simulation, choose an option from the drop down menu below 'Quality'. To save these speed, bender, and quality settings as the default settings that will be automatically selected each time the bend order menu is accessed, click the Make Default button.
To change the travel, bending, rotation, or animation speed, click and hold the slider and drag it back and forth to adjust the speed. To change which bender used in the simulation, select a bender from the drop down menu below 'Bender:'. To adjust the quality of the simulation, choose an option from the drop down menu below 'Quality'. To save these speed, bender, and quality settings as the default settings that will be automatically selected each time the bend order menu is accessed, click the Make Default button. 
The whole right side of the window is occupied by the simulation frame. Any changes made to the bend order will be shown in the simulation. The part will be broken into sections of red and blue. Blue highlights the straight sections of part while red highlights the sections that will be bent. The simulation can be zoomed, moved, and rotated. To zoom, use the mouse scroll wheel. Scroll up to zoom out and scroll down to zoom in. To pan/move the part around, click and hold the scroll wheel or both mouse buttons down. The part will move with the cursor's movements. To rotate the part, click and hold the right mouse button and move the cursor around. The part will rotate with the cursor movements.
To play the simulation click the Play button. ![]()
To pause the simulation at any point, click the Pause button. ![]()
To set the simulation back to the beginning, click Restart. ![]()
To jump to the end of the simulation, click the Finish button. ![]()
To fast forward the simulation, click the Forward button. ![]()
After the simulation plays through, the Restart button ![]() must be clicked before playing it through again.
must be clicked before playing it through again.
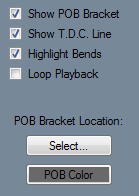
To show a POB bracket in the simulation, check the box next to 'Show POB Bracket'.
To choose a new location for the POB bracket, click the 'Select...' button and click the desired POB bracket location on the part in the simulation window.
To change the color of the bracket, click the 'POB Color' button and select a new color and click 'OK'.
To show a line running down the center of top of the part, check the box next to 'Show T.D.C. Line'. T.D.C. stands for "top dead center".
To have the bends highlighted in a slightly darker hue on the 3D part model shown in the simulation frame, check the box next to Highlight Bends.
To have the simulation continuously play, check the box next to Loop Playback.
Click OK to close the Part Bending Order window and apply any changes made to the bend order. These changes will be shown in the Results table. Click 'Cancel' to close the window without applying any changes.
