Hole (Plate)
Current Item: Plate -- Create -- Hole
Description
Allows placement of holes in a plate.
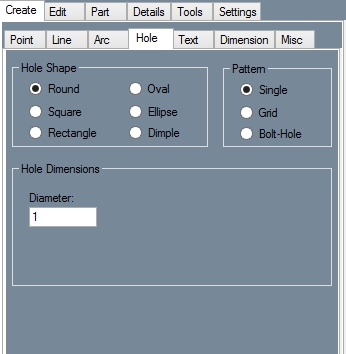
Hole Shape
- Round: Select Round, enter a diameter in the Diameter field, and click on a flange to place a round hole at that point.
- Oval: Select Oval, enter a width and length in the Width and Length field, and enter an angle for the hole in the Angle field. Click on a PickPoint or endpoint to place an oval hole at that point.
- Square: Select Square, enter a width in the width field, and enter an angle for the hole in the Angle field. If you want to automatically round the corners of the square, you can enter a value in the Corner Radius field. Entering 0 in the Corner Radius field will result in square corners. Click on a PickPoint or endpoint to place an oval hole at that point.
- Ellipse: Select Ellipse and click on the Length button. A window will appear with a diagram of a cylinder going through a plate. You must enter the width and angle of this cylinder in the Diameter of Cylinder and Angle of Cylinder fields. The length of the hole will be calculated automatically. Click the Copy button, close the window, and paste the value into the Length field by clicking in the field and hitting the Control key and the "V" key at the same time. Enter the same width and angle that you used before and click on a point to place an elliptical hole at that location.
- Rectangle: Select Rectangle and enter a width and height in the Width and Height fields. Enter an angle in the Angle field and click on a point to place a rectangular hole at that location.
- Dimple: A dimple is a round hole that is slightly raised, so that the plate around the edges of the hole slope up towards the hole. The Inner Diameter is the section that will actually be cut out of the plate. The Outer Diameter is the area of plate surrounding the hole that slants up towards the hole. Enter an inner and outer diameter and a height in the respective fields. Select Up or Down in order to set whether the dimple is raised or pressed into the plate. Click on a point to place a dimple at that location.
Pattern
- Single: To place a single hole at the location that you click, select Simple.
- Grid: To place a grid of holes, select grid. You can place the grid at an angle by entering a value in the Angle field. Enter the number of rows and columns in the grid in the Number of Rows and Number of Columns fields. Enter the spacing between each row in the Row Spacing field and enter the spacing between each column in the Column Spacing field.
- Bolt-Hole: To create a series of holes along an arc, select Bolt-Hole. Enter the radius of the arc in the Radius field. Enter the angle where the series of holes will start in the Start Angle field. To rotate holes as they are placed check the Holes rotate with sweep checkbox. Enter the angular distance between each hole in the Spacing Angle field. Enter the number of holes that you want to place in the Number of Holes field. Click on a point to place the center of the arc at that location.

