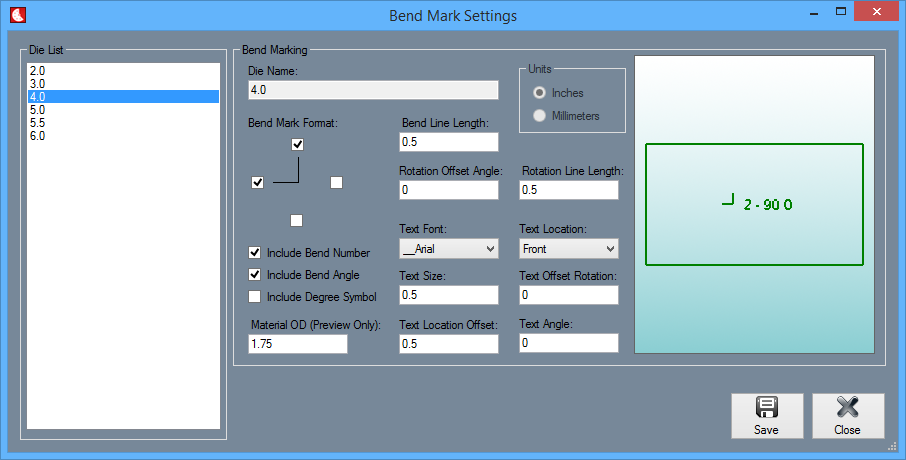
Bend Mark Settings
Contents
- 1 Die List
- 2 Bend Marking
- 2.1 Die Name:
- 2.2 Units
- 2.3 Bend Mark Format:
- 2.4 Include Bend Number
- 2.5 Include Bend Angle
- 2.6 Include Degree Symbol
- 2.7 Material OD (Preview Only):
- 2.8 Bend Line Length:
- 2.9 Rotation Offset Angle:
- 2.10 Text Font:
- 2.11 Text Size:
- 2.12 Text Location Offset:
- 2.13 Rotation Line Length:
- 2.14 Text Location:
- 2.15 Text Offset Rotation:
- 2.16 Text Angle:
- 3 Action Buttons
Die List
Select a die from the Die List and your bend marking information for that die will be displayed in the Bend Marking section to the right. If there are no dies in the list to the left, you must create them first in the Die Library.
Bend Marking
This section is where users will set up the manner in which their bend markings will appear on a part before it is sent out as a flat layout .dxf file or sent to the Dragon machine.
Die Name:
The name of the die in use will be located in this text field.
Units
Your units of measurement are selected previously when adding a die to the Die Library. This section simply shows the units of measurement that are being used for the die that is selected.
Bend Mark Format:
Here, check the checkboxes indicating which of the four bend mark lines you would like to be shown on the design applicable to the selected die.
Include Bend Number
Here, check the Include Bend Number checkbox to include the bend number in the design applicable to the selected die.
Include Bend Angle
Here, check the Include Bend Angle checkbox to include the bend angle in the design applicable to the selected die.
Include Degree Symbol
Here, check the Include Degree Symbol checkbox to include the degree symbol in the design applicable to the selected die.
Material OD (Preview Only):
Here, enter the outside diameter of the tubing you'd like to see in the preview screen to the right. This will only be for these preview purposes and will not change your material of your design.
Bend Line Length:
Here, enter the bend line (vertical line representing the bend location) length and the bend line will adjust accordingly.
Rotation Offset Angle:
Here, enter the rotation offset amount for the rotation alignment marks. This offset is calculated from the inside of the bend.
Text Font:
Here, choose the font of the text you would like to show up on your design.
Text Size:
Here, enter the text size as it will show up on your design.
Text Location Offset:
Here, enter the offset amount for the bend mark text. The bend mark text will be located (along with the tube length) this distance away from the bend mark.
Rotation Line Length:
Here, enter the rotation line (horizontal line representing the rotation) length and the rotation line will adjust accordingly.
Text Location:
Here, choose the location of the text in reference to the front or back of the bend mark.
Text Offset Rotation:
Here, enter the rotational offset amount for the bend mark text. This will offset the text along the y-axis.
Text Angle:
Here, enter the angle that will be applied to the text.
Action Buttons
Save
Click the Save button in order to save the progress of your added and deleted materials from the material references list.
Close
Click the Close button to close the window.
