Difference between revisions of "SolidWorks"
| Line 23: | Line 23: | ||
| − | 4. Lastly, select the SolidWorks icon [[File:SW1.png]]on the Bend-Tech Main Menu bar to import the file. | + | 4. Lastly, select the SolidWorks icon [[File:SW1.png]] on the Bend-Tech Main Menu bar to import the file. |
'''The import process is complete. For more advanced instructions on importing files from SolidWorks, see the [[SolidWorks Import Tutorial]].''' | '''The import process is complete. For more advanced instructions on importing files from SolidWorks, see the [[SolidWorks Import Tutorial]].''' | ||
Revision as of 06:21, 23 September 2014
Bend-Tech 7x Wiki :: Main Menu Bar :: File :: Import :: SolidWorks
To import a part from SolidWorks™, both Bend-Tech and SolidWorks™ need to be open and running.
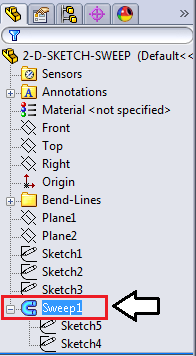
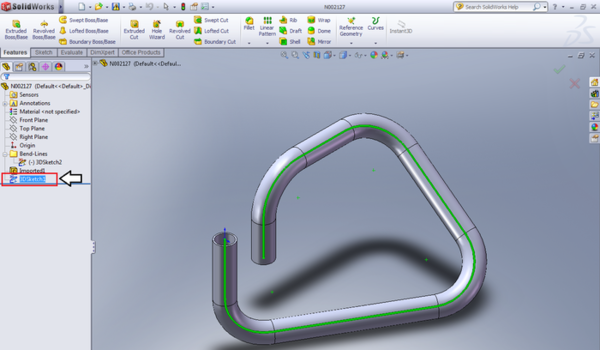
1. First, the 3D Sketch or Sweep of the SolidWorks part needs to be selected in the SolidWorks software.
2. Next, go up to the menu bar at the top of the SolidWorks window, place the cursor over the Bend-Tech option, and click Process Bend Info.
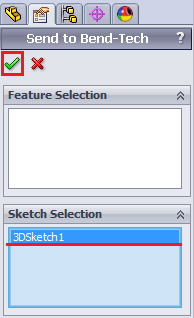
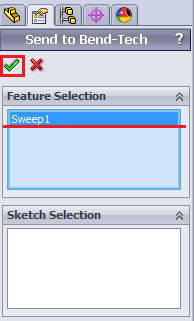
3. The Send To Bend-Tech panel will now be shown on the left side of the window. Select the 3D Sketch or Sweep by clicking on it. Once the correct feature is selected, click on the green arrow icon.
4. Lastly, select the SolidWorks icon ![]() on the Bend-Tech Main Menu bar to import the file.
on the Bend-Tech Main Menu bar to import the file.
The import process is complete. For more advanced instructions on importing files from SolidWorks, see the SolidWorks Import Tutorial.


