Difference between revisions of "Plate/Sheet Library"
| (2 intermediate revisions by the same user not shown) | |||
| Line 1: | Line 1: | ||
'''[[Main Page|Bend-Tech 7x Wiki]] :: [[Main Menu Bar]] :: [[Tools]] :: Plate/Sheet Library''' | '''[[Main Page|Bend-Tech 7x Wiki]] :: [[Main Menu Bar]] :: [[Tools]] :: Plate/Sheet Library''' | ||
__NOTOC__ | __NOTOC__ | ||
| + | |||
[[File:plate_library_1.png|600px|right]] | [[File:plate_library_1.png|600px|right]] | ||
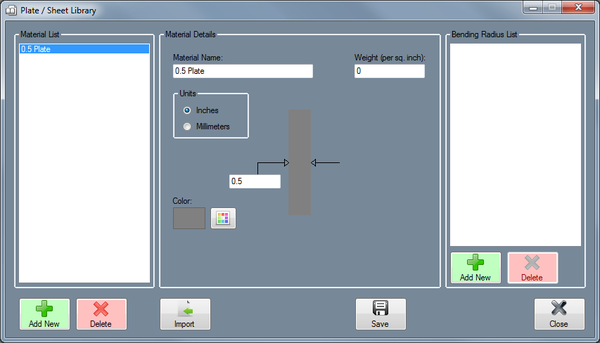
| + | [[File:plate_4.png|left|150px]]The Plate/Sheet Library holds all materials that can be used to create a plate part in the '''[[Plate]]''' designer. On the left side of the window, under 'Material List', a list of all plate/sheet materials is shown. On the far right side of the window, a list of bending radii for the currently selected material is shown below 'Bending Radius List'. | ||
| + | |||
| + | |||
| + | '''To access the plate library''', click on the '''Tools''' menu and click on the '''Tube Library''' option in the drop down menu or click the '''Tube Library''' option on the task menu. | ||
| + | |||
| + | |||
| + | |||
| + | |||
| + | |||
| − | |||
| − | |||
| + | <h3>Material Details</h3> | ||
| − | *''' | + | *'''Material Name:''' This title will be used to refer to the material throughout the software. It is recommended to give each a unique, descriptive name to more easily identify each material. |
| + | *'''Weight:''' The weight of the material ''per unit'' can be supplied here. This value is totally optional, but it will be used to calculate the total weight of the part in the part designer interfaces above the results table. | ||
*'''Units:''' Plate parts can be measured in either inches or millimeters. | *'''Units:''' Plate parts can be measured in either inches or millimeters. | ||
| − | |||
| Line 25: | Line 34: | ||
| + | *'''Color:''' The color of the plate material can be chosen using the '''Color''' button. [[File:color_button.png]] This color will be used to shade the material throughout the software. | ||
| − | |||
<h3>Bending Radius List</h3> | <h3>Bending Radius List</h3> | ||
| − | The bending radius is the | + | The bending radius is the radii that the current material can be bent to. |
| + | |||
| + | '''To add a new bending radius to this list''', first select a material from the material list then click on the '''Add New''' button. [[File:add_die.png]] Supply an inside radius value and click the '''OK''' button. Next, enter a K-factor value and click the '''OK''' button. K Factor is defined as the percentage through the inside radius to the neutral bending axis (See image to the right). Basically, this is the location of the line that runs through the bend where there is no stretching or compression, AKA the neutral bending axis. K factor is measured from the inside edge/radius of the bend to the neutral bending axis on a scale of 0 - 100 or 0 - 1 where 0 is the inside edge/radius of the bend and 100 or 1 is the outside edge/radius of the bend. Everything on the inside of the K factor is compressing and everything on the outside is stretching. | ||
| + | |||
| + | [[File:kfactor.png]] | ||
| + | |||
| + | |||
| + | '''To delete a bending radius''', select the radius to delete by clicking on it then click the '''Delete''' button. [[File:delete_die.png]] | ||
| + | |||
| + | |||
| Line 37: | Line 55: | ||
:<h4>Manual</h4> | :<h4>Manual</h4> | ||
| + | '''To manually add a plate/sheet material to the library''', click the '''Add New''' button. [[File:Add_die.png]] After this button is clicked, all the attribute fields will be available to enter data into. Once all the required details are provided, click the '''Save''' button [[File:Save_die.png]] to add the plate/sheet to the library. | ||
| + | [[File:plate_3.png|right|500px]] | ||
:<h4>Import</h4> | :<h4>Import</h4> | ||
| + | |||
| + | Plate/Sheet libraries from previous versions of the software can be imported into the current plate/sheet library. To do so, a valid '''plate library.txt''' file must be located on the desktop of the computer being used to run the software. If done correctly, the import library window will open when the '''Import''' button [[File:import_library.png]] is clicked. On the left side, there will be a list of the current tubes in the die library. On the right, a list of tubes from the imported library will be shown. | ||
| + | |||
| + | |||
| + | '''To add a plate/sheet''', select a tube in the Imported Library list by clicking on it and then hit the '''Add''' button. [[File:add_import.png]] Click the '''OK''' button to finalize. | ||
| + | |||
| + | |||
| + | '''To add all plates/sheets''', click the '''Add All''' button. [[File:add_all_import.png]] Every plate/sheet from the Imported Library list will be added to the current die library. Click the '''OK''' button to finalize. | ||
| + | |||
| + | |||
| + | '''To remove a recently imported plate''', select the plate from the Current Library list and click the '''Remove''' button. [[File:remove_import.png]] | ||
| + | |||
| + | |||
| + | |||
| + | |||
| + | <h3>Delete Plate/Sheet</h3> | ||
| + | '''To remove a plate/sheet from the plate library''', select a rube in the list and click the '''Delete''' button. [[File:delete_die.png]] | ||
Latest revision as of 07:23, 3 June 2014
Bend-Tech 7x Wiki :: Main Menu Bar :: Tools :: Plate/Sheet Library
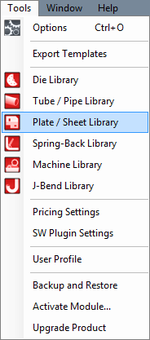
To access the plate library, click on the Tools menu and click on the Tube Library option in the drop down menu or click the Tube Library option on the task menu.
Material Details
- Material Name: This title will be used to refer to the material throughout the software. It is recommended to give each a unique, descriptive name to more easily identify each material.
- Weight: The weight of the material per unit can be supplied here. This value is totally optional, but it will be used to calculate the total weight of the part in the part designer interfaces above the results table.
- Units: Plate parts can be measured in either inches or millimeters.
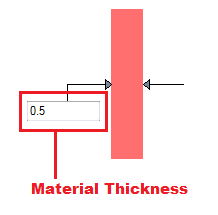
- Material Thickness: The thickness of the plate material will need to be provided here. Enter the value into the field on the part diagram.
- Color: The color of the plate material can be chosen using the Color button.
 This color will be used to shade the material throughout the software.
Bending Radius List
The bending radius is the radii that the current material can be bent to.
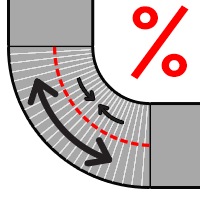
To add a new bending radius to this list, first select a material from the material list then click on the Add New button. ![]() Supply an inside radius value and click the OK button. Next, enter a K-factor value and click the OK button. K Factor is defined as the percentage through the inside radius to the neutral bending axis (See image to the right). Basically, this is the location of the line that runs through the bend where there is no stretching or compression, AKA the neutral bending axis. K factor is measured from the inside edge/radius of the bend to the neutral bending axis on a scale of 0 - 100 or 0 - 1 where 0 is the inside edge/radius of the bend and 100 or 1 is the outside edge/radius of the bend. Everything on the inside of the K factor is compressing and everything on the outside is stretching.
Supply an inside radius value and click the OK button. Next, enter a K-factor value and click the OK button. K Factor is defined as the percentage through the inside radius to the neutral bending axis (See image to the right). Basically, this is the location of the line that runs through the bend where there is no stretching or compression, AKA the neutral bending axis. K factor is measured from the inside edge/radius of the bend to the neutral bending axis on a scale of 0 - 100 or 0 - 1 where 0 is the inside edge/radius of the bend and 100 or 1 is the outside edge/radius of the bend. Everything on the inside of the K factor is compressing and everything on the outside is stretching.
To delete a bending radius, select the radius to delete by clicking on it then click the Delete button. ![]()
Add Plate/Sheet
Manual
To manually add a plate/sheet material to the library, click the Add New button. ![]() After this button is clicked, all the attribute fields will be available to enter data into. Once all the required details are provided, click the Save button
After this button is clicked, all the attribute fields will be available to enter data into. Once all the required details are provided, click the Save button ![]() to add the plate/sheet to the library.
to add the plate/sheet to the library.
Import
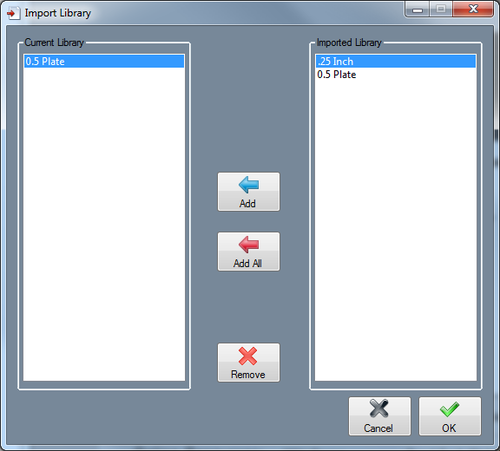
Plate/Sheet libraries from previous versions of the software can be imported into the current plate/sheet library. To do so, a valid plate library.txt file must be located on the desktop of the computer being used to run the software. If done correctly, the import library window will open when the Import button ![]() is clicked. On the left side, there will be a list of the current tubes in the die library. On the right, a list of tubes from the imported library will be shown.
is clicked. On the left side, there will be a list of the current tubes in the die library. On the right, a list of tubes from the imported library will be shown.
To add a plate/sheet, select a tube in the Imported Library list by clicking on it and then hit the Add button. ![]() Click the OK button to finalize.
Click the OK button to finalize.
To add all plates/sheets, click the Add All button. ![]() Every plate/sheet from the Imported Library list will be added to the current die library. Click the OK button to finalize.
Every plate/sheet from the Imported Library list will be added to the current die library. Click the OK button to finalize.
To remove a recently imported plate, select the plate from the Current Library list and click the Remove button. ![]()
Delete Plate/Sheet
To remove a plate/sheet from the plate library, select a rube in the list and click the Delete button. ![]()
