Difference between revisions of "Dragon General Operation"
(→The Operator Panel) |
(→1. The Start Button) |
||
| Line 53: | Line 53: | ||
===1. The Start Button=== | ===1. The Start Button=== | ||
| − | The '''Start''' button will be used after the nesting project is sent to the machine first to send the machine to loading position, then after loading, the user will push '''Start''' again to begin the project. It will also be used to start a job that has been paused. | + | The '''Start''' button will be used after the nesting project is sent to the machine: first to send the machine to loading position, then after loading, the user will push '''Start''' again to begin the project. It will also be used to start a job that has been paused. |
===2. The Pause Button=== | ===2. The Pause Button=== | ||
Revision as of 06:57, 13 April 2018
Contents
Important Machine Operations and Procedures
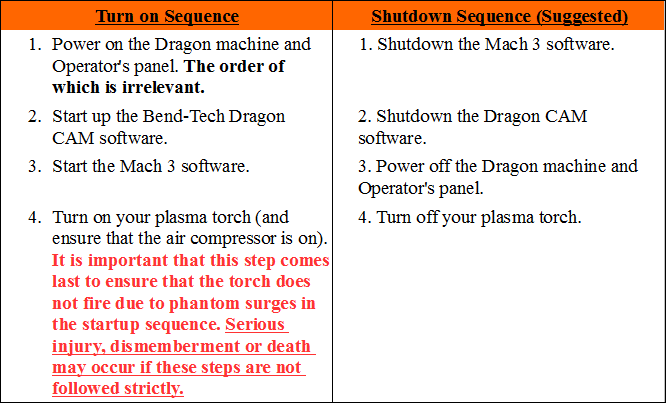
Power on/Shut down Sequence
- The sequence in which the machine/hardware and software are turned on and off is very important. Please follow the instructions as shown here:
Homing the Machine
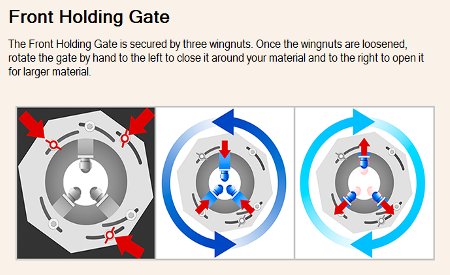
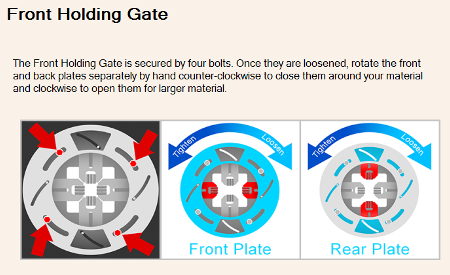
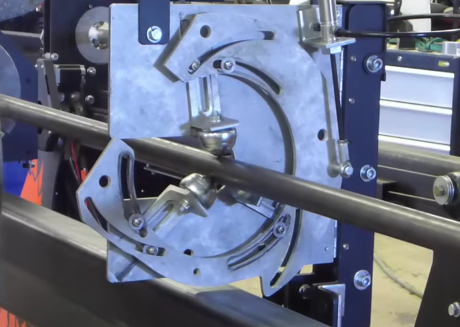
Operating the Gates
- The operation of the gates, whether front round, front square, center round or center square, will be conducted on an as needed basis. The movement and adjustment of these gates will not be necessary for every tube/pipe loaded into the Dragon machine. Adjust the gates only when loading a different OD material than the material that was used beforehand.
Front Gate (Round)
Front Gate (Square)
Center Gate (Round)
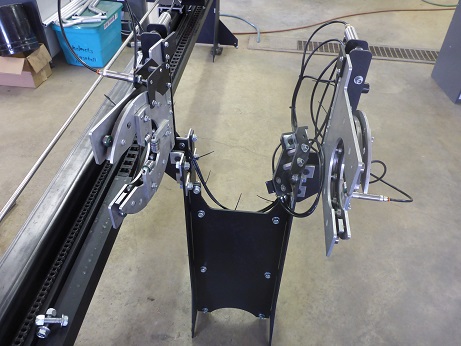
- If the chuck is positioned behind the center gate upon sending it to load position and after loading the tubing for a project, the round center gate will need to be closed manually. This will require swinging the gate into position enveloping the tube, then pulling out the actuator switch behind the gate to secure it.
Center Gate (Square)
- If the chuck is positioned behind the center gate upon sending it to load position and after loading the tubing for a project, the square center gates will need to be closed manually. This will require swinging the gates into position enveloping the tube, then pulling out the actuator switch behind the gate to secure it. NOTE: The gate on the left side of this picture will need to be closed first so that the gate's flat plates rest on each other.
Standard Operation Guide
Upon sending a nesting project to the machine, a few established connections and programs need to be in place. If you have questions about these connections and programs, refer to your Bend-Tech Dragon Checklist and/or contact a Bend-Tech Support Technician for further clarification.
Items that need to be in place
- Mach 3 must be running (either opened manually beforehand or forced to open from Dragon CAM when you click the Transfer to Machine button) and all electronic connections must be secured according to the Dragon Electronic Connections guide.
- Mach 3 must be running the Dragon or Dragon Square profile depending on whether you are cutting round or square material. The material in the nest that is sent to the Dragon Machine from the nesting project will determine which profile is opened unless the Mach 3 software is opened beforehand.
- The RESET button on your Machine Controller must be clicked so that it is steady GREEN. A RED (flashing red and green in Mach 3) reset button indicates that your Mach 3 software is not ready for use with the Dragon Machine.
- The machine must be homed completely using the HOME ALL AXIS button unless it has already been homed and Mach 3 has not been shutdown after the homing process has been completed. NOTE: Home the machine after every calibration and anytime a crash has occurred during operation of the machine. Also, if there is ever any grinding noises coming from any of the motors during operation. Of course, if your motors are grinding, you may have your cutting feed rates set to high and/or you have an issue of torque in a certain motor. In these cases, contact a Bend-Tech Support Technician to assist you in resolving any outstanding issues.
The Operator Panel
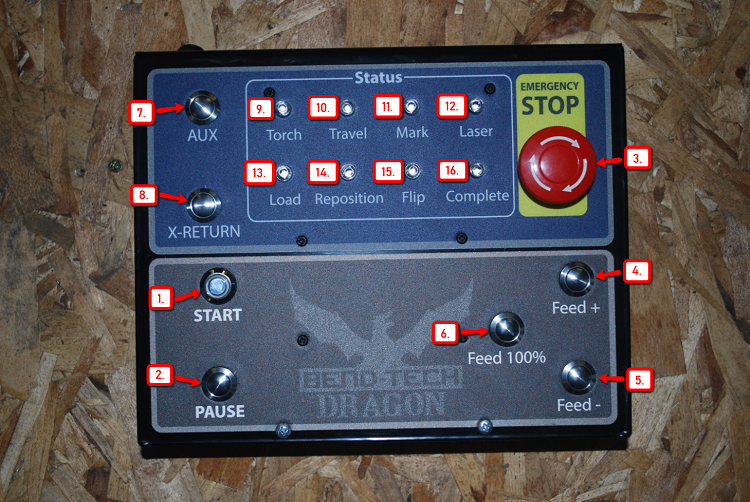
1. The Start Button
The Start button will be used after the nesting project is sent to the machine: first to send the machine to loading position, then after loading, the user will push Start again to begin the project. It will also be used to start a job that has been paused.
2. The Pause Button
The Pause button will be used to pause the machine during operation. The pause will only happen when the torch is not firing. If a pause occurs during rapid travel, the machine may come to an abrupt stop in which case the user risks losing any number of axis positions. The Pause button is best used when the machine's X-axis is not moving.
