Difference between revisions of "Tube/Pipe Library"
| (23 intermediate revisions by 2 users not shown) | |||
| Line 2: | Line 2: | ||
__NOTOC__ | __NOTOC__ | ||
| − | [[File:tube_library_1.png|right| | + | [[File:tube_library_1.png|right]] |
| − | + | [[File:tube_library_3.png|left|150px]]The Tube/Pipe Library holds all the materials that can be used to create single parts. On the right side of the Tube/Pipe Library window, under 'Material List', is the list of each available material. To the right of this list is the area where tube/pipe material information will be shown. | |
| − | + | Each material is defined by supplying custom dimensions, a shape, and units of measure. | |
| + | '''To access the tube/pipe library''', click on the '''Tools menu''' and click on the '''Tube Library''' option in the drop down menu or click on the '''Tube Library''' option on the [[Task Menu]]. | ||
| − | |||
| Line 18: | Line 18: | ||
| − | |||
| + | <h2>Material Details </h2> | ||
| + | *'''Material Name:''' This title will be used to refer to the material throughout the software. It is recommended to give each a unique, descriptive name to more easily identify each material. | ||
| − | |||
| + | *'''Weight:''' The weight of the material ''per unit'' can be supplied here. This value is completely optional, but it will be used to calculate the total weight of the part in the part designer interfaces above the results table. | ||
| + | *'''Type:''' Tube material can be either round, square, or rectangle. | ||
| + | *'''Units:''' Parts can be measured in either inches or millimeters. | ||
| − | *'''Wall Thickness and | + | *'''Wall Thickness, Diameter, and Height:''' Depending on the type of material chosen, there will be different dimensions that will need to be supplied. If the material is round or square, the wall thickness and diameter measurements will be required. These values will be entered into the fields on the material diagram. If the material is rectangular, the wall thickness, diameter/width, and height will need to be provided. Note: The diameter/width and height of all materials are measured from the outside edges. |
[[File:mat_lib_1.png]] [[File:mat_lib_2.png]] | [[File:mat_lib_1.png]] [[File:mat_lib_2.png]] | ||
| Line 53: | Line 56: | ||
:<h4>Import</h4> | :<h4>Import</h4> | ||
| − | Tube/Pipe libraries from previous versions of the software can be imported into the current tube/pipe library. To do so, a valid '''tube library.txt''' file must be located on the desktop of the computer being used to run the software. If done correctly, the import library window will open. On the left side, there will be a list of the current tubes in the die library. On the right, a list of tubes from the imported library will be shown. | + | Tube/Pipe libraries from previous versions of the software can be imported into the current tube/pipe library. To do so, a valid '''tube library.txt''' file must be located on the desktop of the computer being used to run the software. If done correctly, the import library window will open when the '''Import''' button [[File:import_library.png]] is clicked. On the left side, there will be a list of the current tubes in the die library. On the right, a list of tubes from the imported library will be shown. |
| + | |||
| + | |||
'''To add a tube/pipe''', select a tube in the Imported Library list by clicking on it and then hit the '''Add''' button. [[File:add_import.png]] Click the '''OK''' button to finalize. | '''To add a tube/pipe''', select a tube in the Imported Library list by clicking on it and then hit the '''Add''' button. [[File:add_import.png]] Click the '''OK''' button to finalize. | ||
| − | |||
| − | '''To remove a recently imported die''', select the | + | |
| + | '''To add all tube/pipes''', click the '''Add All''' button. [[File:add_all_import.png]] Every tube/pipe from the Imported Library list will be added to the current die library. Click the '''OK''' button to finalize. | ||
| + | |||
| + | |||
| + | |||
| + | '''To remove a recently imported die''', select the plate from the Current Library list and click the '''Remove''' button. [[File:remove_import.png]] | ||
| Line 70: | Line 79: | ||
'''To remove a tube/pipe from the die library''', select a tube in the list and click the '''Delete''' button. [[File:delete_die.png]] | '''To remove a tube/pipe from the die library''', select a tube in the list and click the '''Delete''' button. [[File:delete_die.png]] | ||
| + | |||
| + | <h2>Slot & Tab Settings</h2> | ||
| + | [[File:Tube_Library_Slot_N_Tab1.png|right]] | ||
| + | '''Reserved for Dragon machine owners only, this will be the default widths, heights and lengths of all tabs and slots created in the software with this selected material.''' | ||
| + | |||
| + | [[File:Slot_Tab0_Example1.jpg|right]] | ||
| + | |||
| + | *'''Tab Width:''' Enter the width of the intended tab in this value field. | ||
| + | |||
| + | *'''Slot Minimum Height:''' Enter the minimum height of the intended slot in this value field. | ||
| + | |||
| + | *'''Tab Length Offset:''' Enter the length the tab as it will extend past the adjoining slot's inner wall (may be negative). This value is an offset for the length of the tab. With no offset (zero) the tab will extend into the adjoining tube until it is flush with the inner wall. If you do not wish for the tab to extend that far, you can use a negative offset. A positive offset would mean the tab would extend beyond the inside wall. | ||
| + | |||
| + | *'''Slot Width Offset:''' Enter the amount to oversize the slot in reference to the adjoining tube's tab. This value will allow you to oversize the width of the hole (slot) on the adjoining tube. With no offset, the hole will be that same width as the tab. By adding a positive offset, the hole can be enlarged to allow an easier fit. This value will only affect the width of the hole, not the height. | ||
| + | |||
| + | '''These values will vary depending on the material's OD and wall thickness. Some values require trial and error to achieve optimal results.''' | ||
Latest revision as of 09:41, 10 May 2018
Bend-Tech 7x Wiki :: Main Menu Bar :: Tools :: Tube/Pipe Library
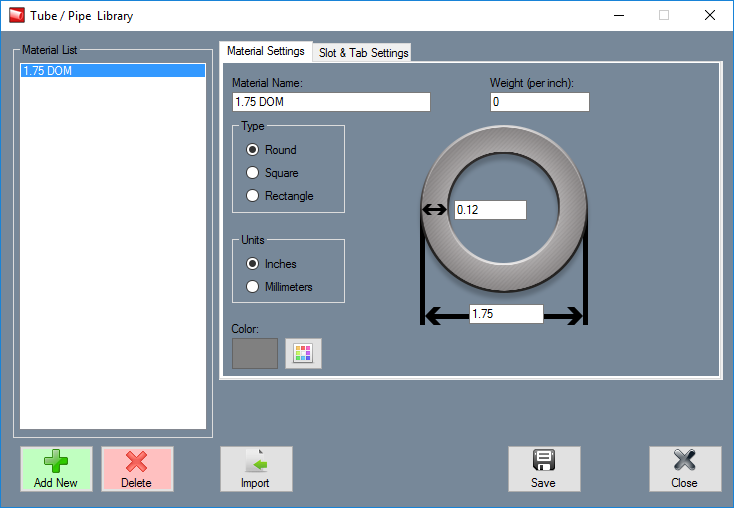
Each material is defined by supplying custom dimensions, a shape, and units of measure.
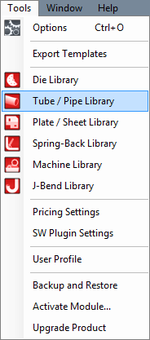
To access the tube/pipe library, click on the Tools menu and click on the Tube Library option in the drop down menu or click on the Tube Library option on the Task Menu.
Material Details
- Material Name: This title will be used to refer to the material throughout the software. It is recommended to give each a unique, descriptive name to more easily identify each material.
- Weight: The weight of the material per unit can be supplied here. This value is completely optional, but it will be used to calculate the total weight of the part in the part designer interfaces above the results table.
- Type: Tube material can be either round, square, or rectangle.
- Units: Parts can be measured in either inches or millimeters.
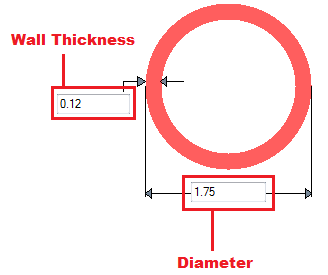
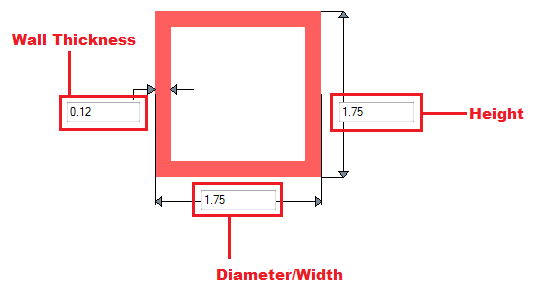
- Wall Thickness, Diameter, and Height: Depending on the type of material chosen, there will be different dimensions that will need to be supplied. If the material is round or square, the wall thickness and diameter measurements will be required. These values will be entered into the fields on the material diagram. If the material is rectangular, the wall thickness, diameter/width, and height will need to be provided. Note: The diameter/width and height of all materials are measured from the outside edges.
- Color: The color of the material can be chosen using the Color button.
 This color will be used to shade the material in various areas throughout the software.
Add Tube/Pipe
Manual
To manually add a material to the library, click the Add New button. ![]() After this button is clicked, all the attribute fields will be available to enter data into. Once all the required details are provided, click the Save button
After this button is clicked, all the attribute fields will be available to enter data into. Once all the required details are provided, click the Save button ![]() to add the tube/pipe to the library.
to add the tube/pipe to the library.
Import
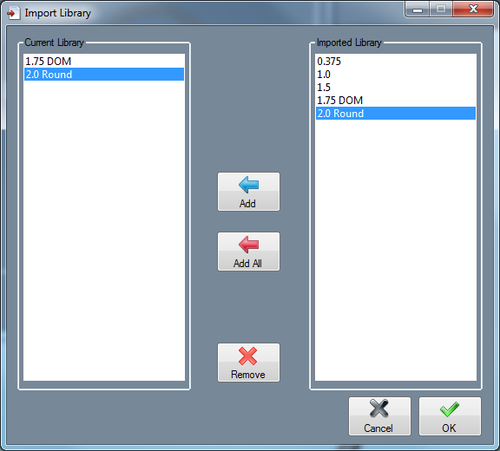
Tube/Pipe libraries from previous versions of the software can be imported into the current tube/pipe library. To do so, a valid tube library.txt file must be located on the desktop of the computer being used to run the software. If done correctly, the import library window will open when the Import button ![]() is clicked. On the left side, there will be a list of the current tubes in the die library. On the right, a list of tubes from the imported library will be shown.
is clicked. On the left side, there will be a list of the current tubes in the die library. On the right, a list of tubes from the imported library will be shown.
To add a tube/pipe, select a tube in the Imported Library list by clicking on it and then hit the Add button. ![]() Click the OK button to finalize.
Click the OK button to finalize.
To add all tube/pipes, click the Add All button. ![]() Every tube/pipe from the Imported Library list will be added to the current die library. Click the OK button to finalize.
Every tube/pipe from the Imported Library list will be added to the current die library. Click the OK button to finalize.
To remove a recently imported die, select the plate from the Current Library list and click the Remove button. ![]()
Delete Tube/Pipe
To remove a tube/pipe from the die library, select a tube in the list and click the Delete button. ![]()
Slot & Tab Settings
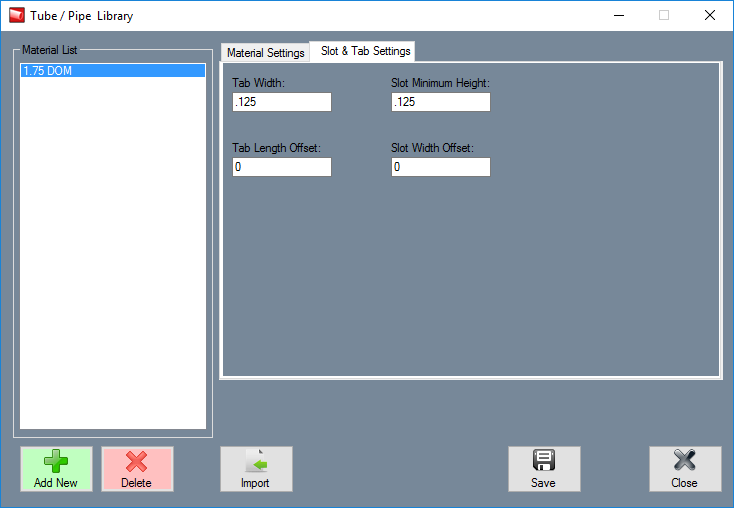
Reserved for Dragon machine owners only, this will be the default widths, heights and lengths of all tabs and slots created in the software with this selected material.
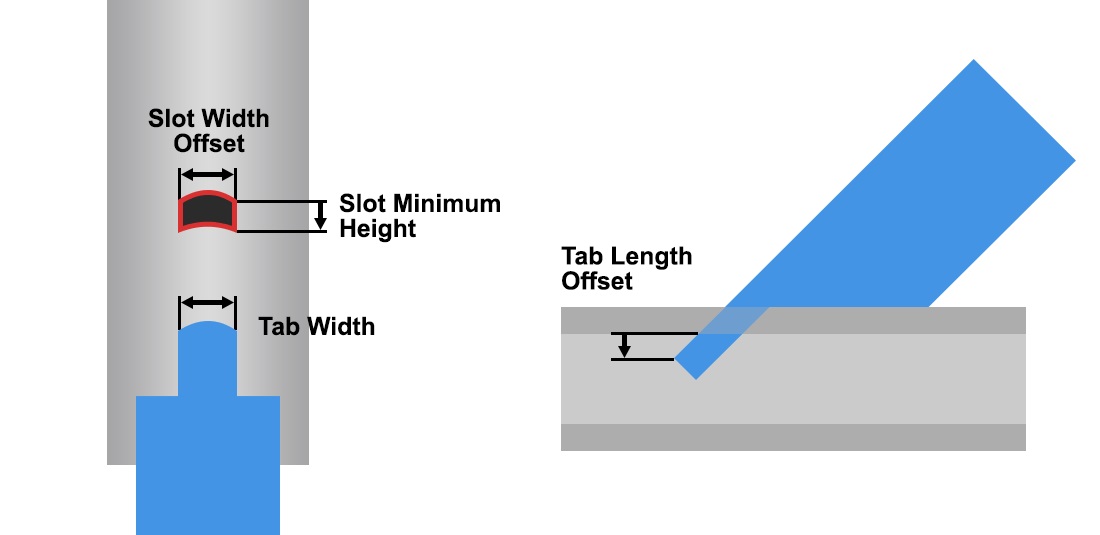
- Tab Width: Enter the width of the intended tab in this value field.
- Slot Minimum Height: Enter the minimum height of the intended slot in this value field.
- Tab Length Offset: Enter the length the tab as it will extend past the adjoining slot's inner wall (may be negative). This value is an offset for the length of the tab. With no offset (zero) the tab will extend into the adjoining tube until it is flush with the inner wall. If you do not wish for the tab to extend that far, you can use a negative offset. A positive offset would mean the tab would extend beyond the inside wall.
- Slot Width Offset: Enter the amount to oversize the slot in reference to the adjoining tube's tab. This value will allow you to oversize the width of the hole (slot) on the adjoining tube. With no offset, the hole will be that same width as the tab. By adding a positive offset, the hole can be enlarged to allow an easier fit. This value will only affect the width of the hole, not the height.
These values will vary depending on the material's OD and wall thickness. Some values require trial and error to achieve optimal results.
