Difference between revisions of "Tools"
| (7 intermediate revisions by the same user not shown) | |||
| Line 2: | Line 2: | ||
__NOTOC__ | __NOTOC__ | ||
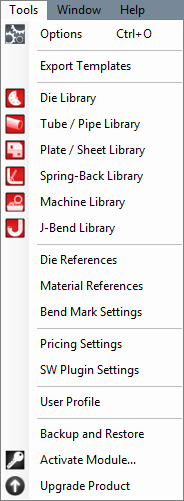
| − | [[File:tools_menu.png| | + | [[File:tools_menu.png|right]]In the Tools menu, the Options Menu, Export Templates, Die Library, Tube/Pipe Library, Plate/Sheet Library, Spring-Back Library, Machine Library, J-Bend Library, Die References, Material References, Bend Mark Settings, Pricing Settings, SW Plugin Settings, User Profile, Backup and Restore, Activate Module and the Upgrade Product menus can be accessed. |
| Line 13: | Line 13: | ||
<h3>[[Export Template]]</h3> | <h3>[[Export Template]]</h3> | ||
In the Export Template Design menu, the designs of Export Templates can be set up. Follow the "Export Template" link for further information on designing export templates. | In the Export Template Design menu, the designs of Export Templates can be set up. Follow the "Export Template" link for further information on designing export templates. | ||
| − | |||
| − | |||
| − | |||
| − | |||
| − | |||
| − | |||
| − | |||
| Line 38: | Line 31: | ||
[[File:springback_lib.png|70px|link=SpringBack Library]] <h3>[[SpringBack Library]]</h3> | [[File:springback_lib.png|70px|link=SpringBack Library]] <h3>[[SpringBack Library]]</h3> | ||
| − | + | The Spring-Back Library contains all of your entries for spring-back based on your material and dies. | |
[[File:machine_lib.png|70px|link=Machine Library]] <h3>[[Machine Library]]</h3> | [[File:machine_lib.png|70px|link=Machine Library]] <h3>[[Machine Library]]</h3> | ||
| Line 45: | Line 38: | ||
[[File:j_bend_lib.png|70px|link=J-Bend Library]] <h3>[[J-Bend Library]]</h3> | [[File:j_bend_lib.png|70px|link=J-Bend Library]] <h3>[[J-Bend Library]]</h3> | ||
| − | The J-Bend Library stores all J-Bends that can be used to create headers. | + | The J-Bend Library stores all J-Bends that can be used to create headers. (This is only available when the Header Module has been purchased.) |
| + | |||
| + | |||
| + | [[File:die_references1.png|70px|link=Die References]] <h3>[[Die References]]</h3> | ||
| + | The Die References will associate a selected die with a selected material and will give you the option for setting up CLR tolerances for importing purposes. If the imported part's detected CLR falls within the bounds of the tolerances set up here, then the die will automatically be applied for you. (This is only available in our SE and Industrial products.) | ||
| + | |||
| + | |||
| + | [[File:material_references1.png|70px|link=Material References]] <h3>[[Material References]]</h3> | ||
| + | The Material References will associate a selected material with an imported material. Any imported material, based on material width, height and wall thickness will automatically be changed to the associated material chosen here. (This is available in our SE and Industrial products.) | ||
| + | |||
| + | |||
| + | [[File:Bend-Mark_Settimgs1.png|70px|link=Bend Mark Settings]] <h3>[[Bend Mark Settings]]</h3> | ||
| + | The Bend Mark Settings will allow you to set the way in which bend markings will appear on the selected material tube/pipe. This is meant for showing bend markings for a flat layout of the tube project when exporting as a .dxf file or before fabrication with the Dragon machine. (This is only available in our Industrial product.) | ||
<h3>[[Pricing Settings]]</h3> | <h3>[[Pricing Settings]]</h3> | ||
| − | Once the price settings have been set up, the total cost of a part, plate, or assembly, including labor, setup time, time per bend, and cost per unit, can be determined. | + | Once the price settings have been set up, the total cost of a part, plate, or assembly, including labor, setup time, time per bend, and cost per unit, can be determined and shown in the Assembly interface. (This is only available in our SE product.) |
<h3>SW Plugin Settings</h3> | <h3>SW Plugin Settings</h3> | ||
| − | [[File:plugin_settings.png| | + | [[File:plugin_settings.png|right]] |
<h4>Import Settings</h4> | <h4>Import Settings</h4> | ||
'''Manual Import:''' This option makes it so SolidWorks files need to be defined manually before being fully imported once they have been sent to Bend-Tech. | '''Manual Import:''' This option makes it so SolidWorks files need to be defined manually before being fully imported once they have been sent to Bend-Tech. | ||
| Line 67: | Line 72: | ||
| − | <h4>Register SW Plugin</h4> | + | <h4>[[Register SW Plugin]]</h4> |
This button is used to register an SW module after it has been activated using [[Tools#Activate Module|Activate Module]]. | This button is used to register an SW module after it has been activated using [[Tools#Activate Module|Activate Module]]. | ||
| Line 77: | Line 82: | ||
<h3>User Profile</h3> | <h3>User Profile</h3> | ||
| − | [[File:user_profile.png| | + | [[File:user_profile.png|right]] |
Entering information in the User Profile allows the user to have their information attached to the software. The initials given here will be printed on any setup sheets that are printed out. | Entering information in the User Profile allows the user to have their information attached to the software. The initials given here will be printed on any setup sheets that are printed out. | ||
| Line 103: | Line 108: | ||
<h3>Activate Module</h3> | <h3>Activate Module</h3> | ||
| − | [[File:activate_module.png| | + | [[File:activate_module.png|right]] Sheet Metal, Header Design, SolidWorks, Hand Railing, and Large Radius Bending modules can be activated using this menu. To activate a module, select the module from the list on the left by clicking on it. Enter the activation code and click the '''Activate''' button to confirm. Lastly, click the '''Update''' button to update the software with the new module(s). |
| Line 127: | Line 132: | ||
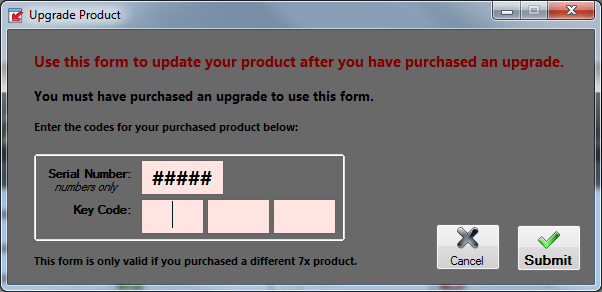
After purchasing an upgrade for your Bend-Tech software, it can be updated using this form. The '''Serial Number''' and '''Key Code''' are required to successfully upgrade. | After purchasing an upgrade for your Bend-Tech software, it can be updated using this form. The '''Serial Number''' and '''Key Code''' are required to successfully upgrade. | ||
| − | [[File:upgrade_product.png| | + | [[File:upgrade_product.png|right]] |
Latest revision as of 11:25, 18 December 2015
Bend-Tech 7x Wiki :: Main Menu Bar :: Tools

Options
Click 'Options' to access the options/settings menu. Follow the "Options" link for further information on each tab in the Options menu.
Export Template
In the Export Template Design menu, the designs of Export Templates can be set up. Follow the "Export Template" link for further information on designing export templates.

Die Library
The die library stores all of the dies that can be used. On the left side of the die library, a list of all available dies is show below 'Die List'. To the right of the list, Die details, die limitations, and user defined definitions are shown.

Tube/Pipe Library
The Tube/Pipe Library holds all the materials that can be used to create bent parts in the part designers.

Plate/Sheet Library
The Plate/Sheet Library holds all materials that can be used to create plate parts.

SpringBack Library
The Spring-Back Library contains all of your entries for spring-back based on your material and dies.

Machine Library
The Machine Library stores all machines that can be used to apply settings to and simulate the bending of a single part.

J-Bend Library
The J-Bend Library stores all J-Bends that can be used to create headers. (This is only available when the Header Module has been purchased.)

Die References
The Die References will associate a selected die with a selected material and will give you the option for setting up CLR tolerances for importing purposes. If the imported part's detected CLR falls within the bounds of the tolerances set up here, then the die will automatically be applied for you. (This is only available in our SE and Industrial products.)

Material References
The Material References will associate a selected material with an imported material. Any imported material, based on material width, height and wall thickness will automatically be changed to the associated material chosen here. (This is available in our SE and Industrial products.)

Bend Mark Settings
The Bend Mark Settings will allow you to set the way in which bend markings will appear on the selected material tube/pipe. This is meant for showing bend markings for a flat layout of the tube project when exporting as a .dxf file or before fabrication with the Dragon machine. (This is only available in our Industrial product.)
Pricing Settings
Once the price settings have been set up, the total cost of a part, plate, or assembly, including labor, setup time, time per bend, and cost per unit, can be determined and shown in the Assembly interface. (This is only available in our SE product.)
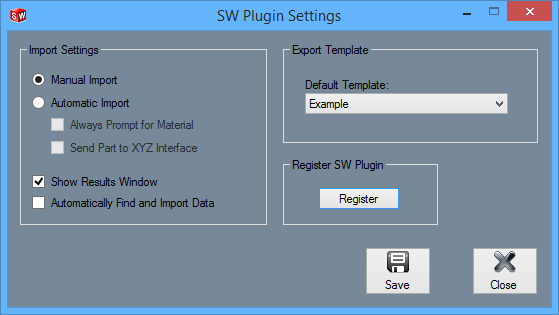
SW Plugin Settings
Import Settings
Manual Import: This option makes it so SolidWorks files need to be defined manually before being fully imported once they have been sent to Bend-Tech.
Automatic Import: While this option is enabled, Bend-Tech will attempt to automatically define and import all SolidWorks files that have been sent to Bend-Tech. If Automatic Import is selected and Always Prompt for Material is checked, every time a SolidWorks file is automatically imported, a material must be chosen for the part. If Automatic Import is selected and Send Part to XYZ Interface is checked, once SolidWorks parts are imported, they will be sent to the XYZ part design interface.
Show Results Window: Check this option to open the Part Details window once the part has been fully imported.
Automatically Find and Import Data: Check this option to have SolidWorks parts automatically brought into the import interface once a part has been send to Bend-Tech without having to click the SolidWorks icon at the top of the window or File - Import - SolidWorks.
Export Template
The default export template design can be set here. Export templates are defined in the Export Template designer. This template will be the export template that is initially chosen when the Part Details window shows up. To change the export template, click the drop down menu and select an option from the list.
Register SW Plugin
This button is used to register an SW module after it has been activated using Activate Module.
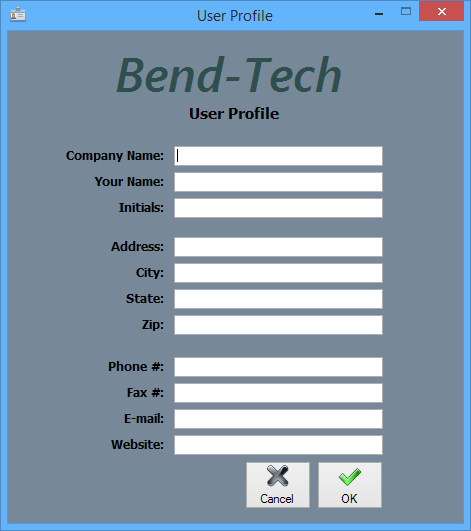
User Profile
Entering information in the User Profile allows the user to have their information attached to the software. The initials given here will be printed on any setup sheets that are printed out.
To add or change any of the user profile information, simply enter a new definition for any of the available fields. Click 'OK' to save and exit. Click 'Cancel' to exit without saving any entered information.
Backup and Restore
The software can backup and/or restore all the data libraries, part files, assembly files, favorite templates, user profile, export templates, and program settings.
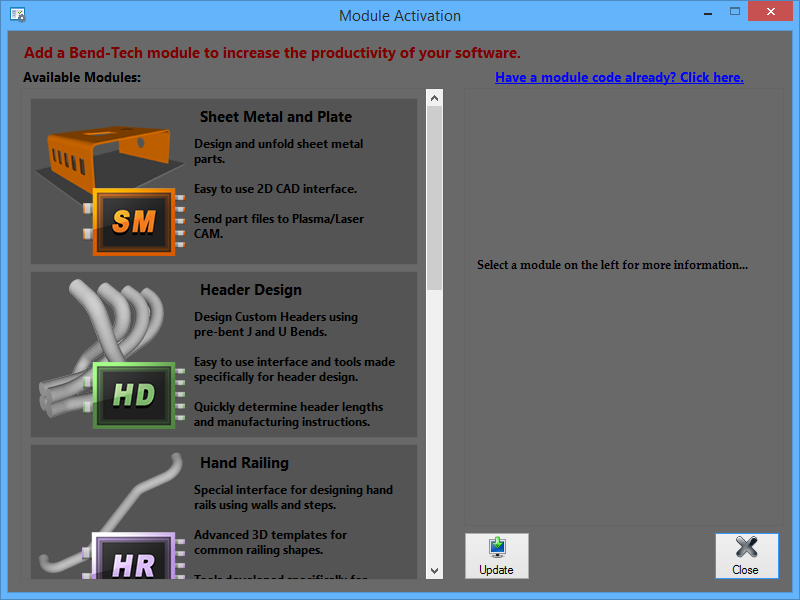
Activate Module
Sheet Metal, Header Design, SolidWorks, Hand Railing, and Large Radius Bending modules can be activated using this menu. To activate a module, select the module from the list on the left by clicking on it. Enter the activation code and click the Activate button to confirm. Lastly, click the Update button to update the software with the new module(s).
Upgrade Product
After purchasing an upgrade for your Bend-Tech software, it can be updated using this form. The Serial Number and Key Code are required to successfully upgrade.
