Difference between revisions of "Tube/Pipe Library"
| Line 2: | Line 2: | ||
__NOTOC__ | __NOTOC__ | ||
| − | [[File:tube_library_1.png|right| | + | [[File:tube_library_1.png|right|550px]] |
| + | <h3>Material Details </h3> | ||
| + | |||
| + | *'''Material Name:''' This title will be used to refer to the material throughout the software. It is recommended to give the material a unique, descriptive name to more easily identify each material. | ||
| + | |||
| + | |||
| + | |||
| + | |||
| + | |||
| + | *'''Weight:''' The weight of the material ''per unit'' can be supplied here. This value is totally optional, but it will be used to calculate the total weight of the part in the part designer interfaces above the results table. | ||
| + | |||
| + | |||
| + | |||
| + | |||
| + | |||
| + | |||
| + | *'''Type:''' Tube material can be either round, square, or rectangle. | ||
| + | |||
| + | |||
| + | |||
| + | |||
| + | |||
| + | |||
| + | *'''Units:''' Parts can be measured in either inches or millimeters. | ||
| + | |||
| + | |||
| + | |||
| + | |||
| − | |||
| − | *''' | + | *'''Wall Thickness and Diameter:''' Depending on the type of material chosen, there will be different dimensions that will need to be supplied. If the material is round or square, the wall thickness and diameter measurements will be required. These values will be entered into the fields on the material diagram. If the material is rectangular, the wall thickness, diameter/width, and height will need to be provided. Note: The diameter/width and height of all materials are measured from the outside edges. |
| − | + | [[File:mat_lib_1.png]] [[File:mat_lib_2.png]] | |
| − | |||
| − | |||
| − | *''' | + | *'''Color:''' The color of the material can be chosen using the '''Color''' button. [[File:color_button.png]] This color will be used to shade the material in various areas throughout the software. |
| − | |||
| − | |||
<h3>Add Tube/Pipe</h3> | <h3>Add Tube/Pipe</h3> | ||
| + | |||
| + | :<h4>Manual</h4> | ||
| + | |||
| + | '''To manually add a material to the library''', click the '''Add New''' button. [[File:add_die.png]] After this button is clicked, all the attribute fields will be available to enter data into. Once all the required details are provided, click the '''Save''' button [[File:save_die.png]] to add the tube/pipe to the library. | ||
| + | |||
| + | |||
| + | :<h4>Import</h4> | ||
| + | |||
<h3>Delete Tube/Pipe</h3> | <h3>Delete Tube/Pipe</h3> | ||
Revision as of 09:51, 30 May 2014
Bend-Tech 7x Wiki :: Main Menu Bar :: Tools :: Tube/Pipe Library
Material Details
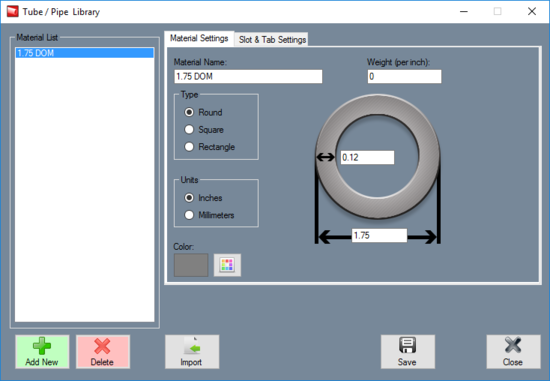
- Material Name: This title will be used to refer to the material throughout the software. It is recommended to give the material a unique, descriptive name to more easily identify each material.
- Weight: The weight of the material per unit can be supplied here. This value is totally optional, but it will be used to calculate the total weight of the part in the part designer interfaces above the results table.
- Type: Tube material can be either round, square, or rectangle.
- Units: Parts can be measured in either inches or millimeters.
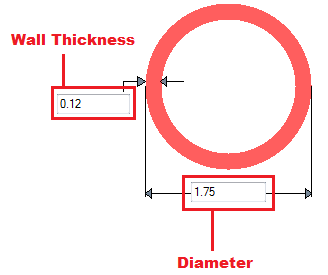
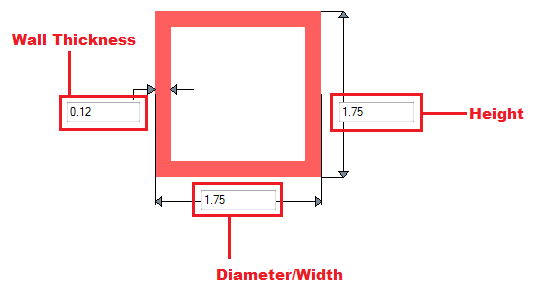
- Wall Thickness and Diameter: Depending on the type of material chosen, there will be different dimensions that will need to be supplied. If the material is round or square, the wall thickness and diameter measurements will be required. These values will be entered into the fields on the material diagram. If the material is rectangular, the wall thickness, diameter/width, and height will need to be provided. Note: The diameter/width and height of all materials are measured from the outside edges.
- Color: The color of the material can be chosen using the Color button.
 This color will be used to shade the material in various areas throughout the software.
Add Tube/Pipe
Manual
To manually add a material to the library, click the Add New button. ![]() After this button is clicked, all the attribute fields will be available to enter data into. Once all the required details are provided, click the Save button
After this button is clicked, all the attribute fields will be available to enter data into. Once all the required details are provided, click the Save button ![]() to add the tube/pipe to the library.
to add the tube/pipe to the library.
Import


