Difference between revisions of "Export Template"
(Created page with "'''Bend-Tech 7x Wiki :: Main Menu Bar :: Tools :: Export Templates''' In the Export Template Design menu, the export templates can be viewed, edited, d...") |
|||
| Line 1: | Line 1: | ||
'''[[Main Page|Bend-Tech 7x Wiki]] :: [[Main Menu Bar]] :: [[Tools]] :: Export Templates''' | '''[[Main Page|Bend-Tech 7x Wiki]] :: [[Main Menu Bar]] :: [[Tools]] :: Export Templates''' | ||
| + | __NOTOC__ | ||
| + | [[File:tools_exporttemp.png|right|500px]] | ||
| + | |||
| + | |||
| + | Export Template allows part information to be exported to a file with custom formatting. Each template is designed to contain specific part information and tables. | ||
| − | |||
| + | These kinds of files can include die attributes, material characteristics, part design information, an XYZ coordinate table, and/or an LRA data table. Files can also be given custom file extensions. In the Export Template Design menu, the export templates can be viewed, edited, deleted, and/or added. Export Templates determine how and what part information will be displayed when a part is exported as a template. | ||
| − | [[File: | + | [[File:export_temp_1.png|550px]] |
| − | |||
| − | |||
| − | + | <h3>Add Template</h3> | |
| − | + | To add a new export template design, click the '''New''' button. [[File:export_temp_2.png]] Enter a name for the template is the prompt window and click '''OK'''. Once added, the new template will be automatically selected in the 'Available Templates' menu. Once a template is added, it can be edited using the editing functions explained below. | |
| − | To | ||
| − | |||
| − | |||
| + | <h3>Edit Template</h3> | ||
| + | To edit a template, first select the template from the menu. Once chosen, the template contents will be displayed in the design area below and the edit tools can be used to change the template. | ||
| − | |||
| + | <h4>Variables</h4> | ||
| + | [[File:export_temp_3.png|right]] | ||
| + | Variables are shown in the variable list on the right of the window. Part attribute and table variables are used as placeholders for the actual part information that will be included in the file. | ||
| − | ''' | + | Variables are broken into four categories: Die, Material, Design, and Tables. Each section can be expanded to view the variables by clicking on the '''plus''' [[File:plus.png]] next to the category name. Click the '''minus''' [[File:minus.png]] to collapse the section again. See image to the right. |
| − | + | '''To add a variable to the template''', double click on the variable in the variable list. The variable will be placed at the current cursor location in the template design area. Each variable will be surrounded by a '''"$"''' and a '''"%"'''. ''Be sure to keep these symbols in place as the variable will not appear in the final exported file if either of them are removed accidentally.'' | |
| − | |||
| − | |||
| − | |||
| − | |||
| − | |||
| − | |||
| − | |||
| − | |||
| − | + | <h4>Bend Data Settings</h4> | |
| + | [[File:export_temp_4.png|right]] | ||
| + | The settings listed below the Bend Data Settings heading at the bottom of the window will control what is included in and how information is displayed in an '''$LRA Data Table%''' variable. | ||
| − | + | These settings will only have an effect on the current template's LRA table. These settings will also have no effect if there is no LRA table in the current template. | |
Revision as of 07:22, 2 June 2014
Bend-Tech 7x Wiki :: Main Menu Bar :: Tools :: Export Templates
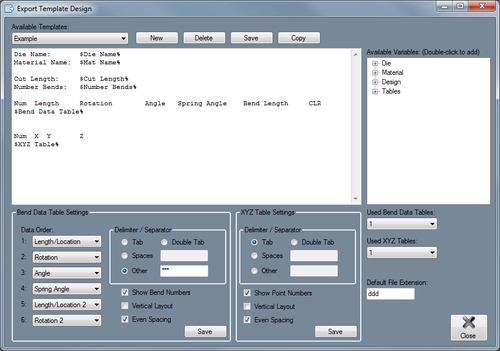
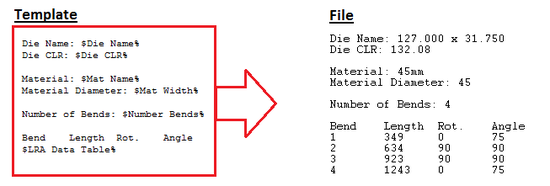
Export Template allows part information to be exported to a file with custom formatting. Each template is designed to contain specific part information and tables.
These kinds of files can include die attributes, material characteristics, part design information, an XYZ coordinate table, and/or an LRA data table. Files can also be given custom file extensions. In the Export Template Design menu, the export templates can be viewed, edited, deleted, and/or added. Export Templates determine how and what part information will be displayed when a part is exported as a template.
Add Template
To add a new export template design, click the New button. ![]() Enter a name for the template is the prompt window and click OK. Once added, the new template will be automatically selected in the 'Available Templates' menu. Once a template is added, it can be edited using the editing functions explained below.
Enter a name for the template is the prompt window and click OK. Once added, the new template will be automatically selected in the 'Available Templates' menu. Once a template is added, it can be edited using the editing functions explained below.
Edit Template
To edit a template, first select the template from the menu. Once chosen, the template contents will be displayed in the design area below and the edit tools can be used to change the template.
Variables
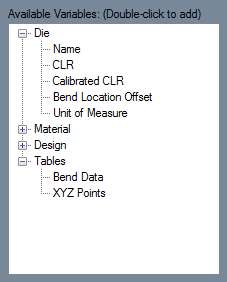
Variables are shown in the variable list on the right of the window. Part attribute and table variables are used as placeholders for the actual part information that will be included in the file.
Variables are broken into four categories: Die, Material, Design, and Tables. Each section can be expanded to view the variables by clicking on the plus ![]() next to the category name. Click the minus
next to the category name. Click the minus ![]() to collapse the section again. See image to the right.
to collapse the section again. See image to the right.
To add a variable to the template, double click on the variable in the variable list. The variable will be placed at the current cursor location in the template design area. Each variable will be surrounded by a "$" and a "%". Be sure to keep these symbols in place as the variable will not appear in the final exported file if either of them are removed accidentally.
Bend Data Settings
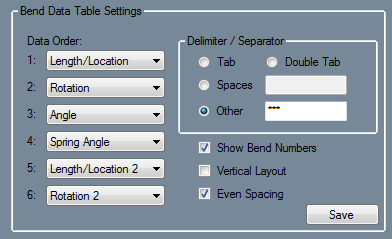
The settings listed below the Bend Data Settings heading at the bottom of the window will control what is included in and how information is displayed in an $LRA Data Table% variable.
These settings will only have an effect on the current template's LRA table. These settings will also have no effect if there is no LRA table in the current template.


