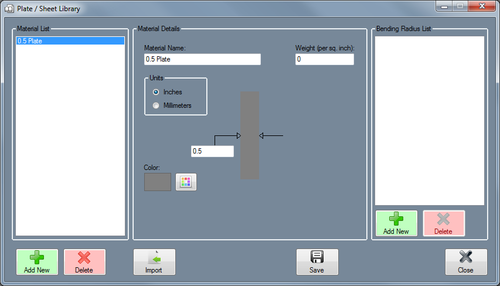
Plate/Sheet Library
Bend-Tech 7x Wiki :: Main Menu Bar :: Tools :: Plate/Sheet Library
View/Edit: To view a material's information, select a material from the list by clicking on the material name. The selected material's information will be shown to the right of the 'Material List' under 'Material Details'. While a material is selected, its details can be edited. To apply any changes made to a material, click the 'Apply' button.
Add/Remove Materials: To add a new material, click the 'Add New' button below the 'Material List'. Fill in the Material Name, Weight(if known, otherwise leave blank), width, and choose which units the material uses. Choose a color by clicking the 'Color' button. Click the 'Apply' button to save the material's information and to add it to the 'Material List'. To remove a material from the Plate/Sheet Library, select the material's name in the list and click the 'Delete' button.
Add Remove Bend Radius: The bending radius is the radius that the material can be bent to. To add a bending radius, click the 'Add New' button below the 'Bending Radius List'. Enter the inside bending radius and click 'OK'. Next, enter the K-Factor for the bend radius. In most cases, the default K-Factor will be sufficient. ***K-Factor Appendix. Click 'OK' again. The new bend radius will then be added to the 'Bending Radius List'.
Print: Click 'Print' to print out a chart of all plate/sheet materials in the library. Once clicked, a new window containing a chart of the plate/sheet materials will appear. To adjust the height of a row, click on the horizontal dividing line, hold the mouse button down, and drag the cursor up and down. To adjust the width of a column, click on the vertical dividing line in the title area, hold the mouse button down, and drag the cursor back and forth. To reorder the list based on a specific material attribute, click on either name, width, height, thick, color, weight, units, type, cost, cut time or setup, notch time or setup, or weld time or setup at the top of the chart. For example, click on 'Thick' to toggle between listing the parts from largest to smallest thickness and smallest to largest thickness. Click 'Print' to print the current view of the chart. Click 'Close' to close the window without printing.
Close: Click 'Close' to close the Plate/Sheet Library.
